Crispy Panko Chicken Cutlet Recipe
- Time: Active 10 minutes, Passive 0 minutes, Total 20 minutes
- Flavor/Texture Hook: Shatter crisp panko crust with a velvety, juicy center
- Perfect for: Busy weeknight dinners, family gatherings, or meal prep sandwiches
- Hearty Comfort in Every Bite
- Fast Weeknight Chicken Cooking Metrics
- Essential Pantry Items for Crispy Chicken
- Tools for the Perfect Golden Fry
- Step by Step Breaded Chicken Method
- Common Mistakes and Professional Fixes
- Troubleshooting Common Issues
- Budget Swaps and Healthier Tweaks
- Storage and Smart Leftover Ideas
- Pairing Suggestions and Presentation Ideas
- Recipe FAQs
- 📝 Recipe Card
Hearty Comfort in Every Bite
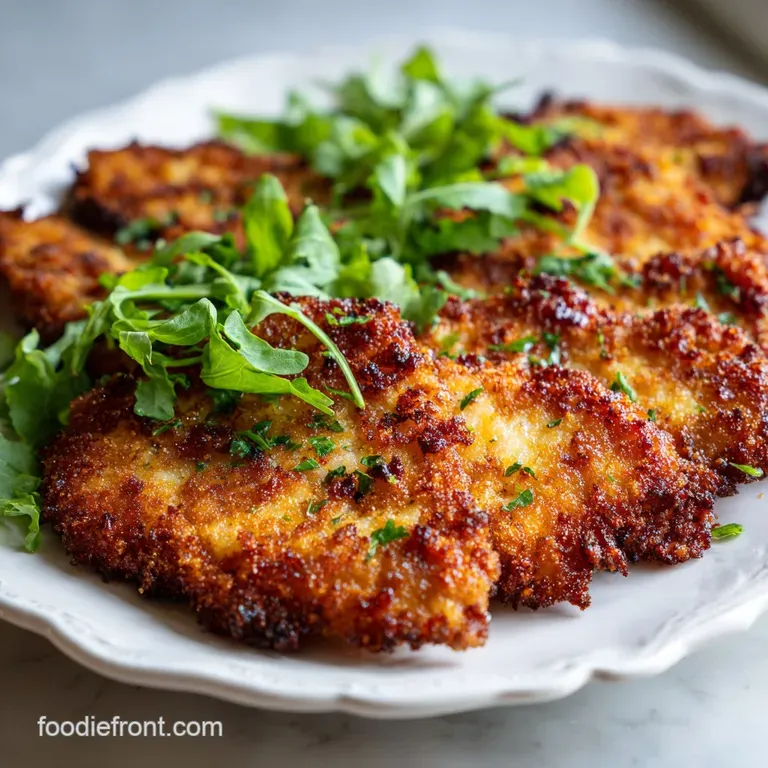
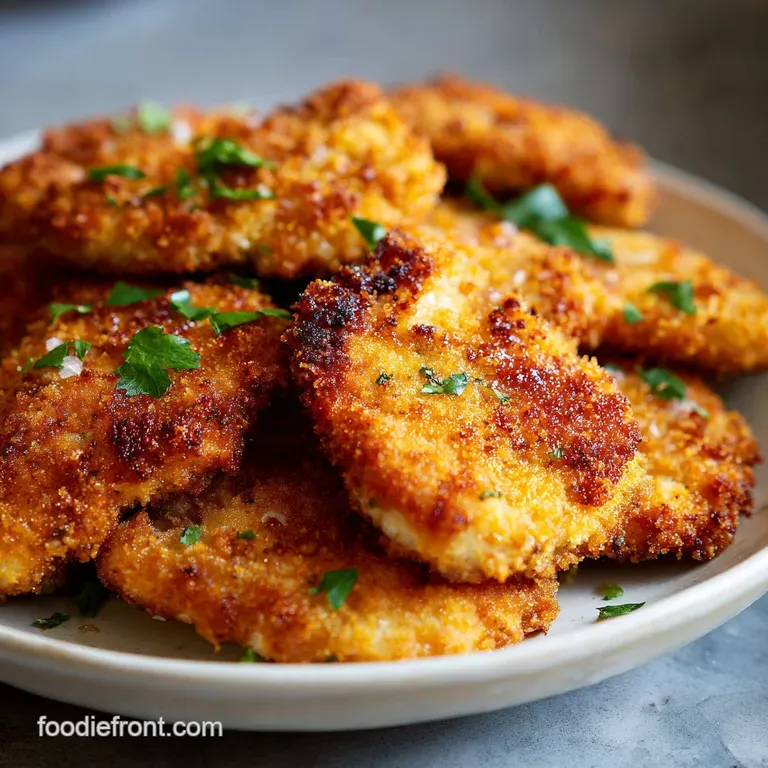
We all need those "back pocket" recipes that we can make with our eyes closed. This is that dish for me. It's the ultimate crowd pleaser because it's familiar but done well. When you bite into a properly made cutlet, you get that initial resistance from the panko, then the salty kick of the parmesan, followed by the tender, seasoned chicken.
It’s a texture game more than anything.
The beauty of this chicken cutlet recipe is how it stretches a buck. A pound and a half of chicken breast might not seem like much for a family of four, but once you pound them thin and bread them, they cover the whole plate. It feels like a feast.
Plus, any leftovers make the best cold sandwiches the next day, which is a massive win for the school lunch struggle.
The Physics of the Crunch: Pounding the meat breaks down tough muscle fibers while increasing the surface area for the Maillard reaction to occur. This ensures the chicken cooks in under three minutes per side, preventing the moisture from evaporating before the crust is set.
| Thickness | Internal Temp | Rest Time | Visual Cue |
|---|---|---|---|
| 1/4 inch | 165°F (74°C) | 3 minutes | Golden brown crust with clear juices |
| 1/2 inch | 165°F (74°C) | 5 minutes | Darker crust, needs lower heat |
| 3/4 inch | 165°F (74°C) | 7 minutes | Risk of dry edges; not recommended |
When you're choosing your method, think about how much time you have. A classic fry is faster and gives that traditional flavor, but if you're making a huge batch, the oven might save your sanity.
| Method | Time | Texture | Best For |
|---|---|---|---|
| Shallow Fry | 10 minutes | Maximum crunch | Traditional dinner |
| Oven Baked | 20 minutes | Even browning | Large crowds/Low oil |
| Air Fryer | 12 minutes | Very crispy | Quick lunch for two |
Fast Weeknight Chicken Cooking Metrics
Cooking by feel is great once you've done it a hundred times, but when you're starting out, numbers are your best friend. I used to guess when the oil was ready by flicking water into the pan. Don't do that. It’s dangerous and messy. Now I just look for the "shimmer" or use a tiny piece of bread as a scout.
If it sizzles immediately, we are in business.
We want to aim for a specific golden hue. If it’s pale, it’ll be soggy. If it’s dark brown, the parmesan might taste bitter. You're looking for that "honey gold" shade. And trust me, don't crowd the pan.
If you put too many pieces in at once, the oil temperature drops, and instead of frying, the chicken just sits there soaking up grease. That's how you get a heavy, oily mess.
| Component | Science Role | Pro Secret |
|---|---|---|
| Panko Breadcrumbs | High surface area | Press firmly into the meat to create "points" of crunch |
| Parmesan Cheese | Fat and Umami | Use freshly grated; pre shaken stuff won't melt as well |
| Large Eggs | Protein Binder | Add a splash of water to thin the proteins for a lighter coat |
If you find yourself out of a specific ingredient, don't panic. Cooking is about being flexible, especially when you're trying to keep the grocery bill down. I've used all sorts of things as backups, and honestly, sometimes the "emergency" version becomes the new favorite.
Essential Pantry Items for Crispy Chicken
Here is exactly what I pull out of my pantry to make this happen. I've listed the official quantities, but I've also included some notes on why these specific items work and what you can use if you're staring at an empty shelf.
- 1.5 lbs Boneless Skinless Chicken Breasts: Why this? They pound out evenly for fast, consistent cooking.
- Substitute: Chicken thighs (boneless). They are juicier but take 2 minutes longer per side.
- 0.5 cup All purpose flour: Why this? Dries the surface so the egg has something to grip.
- Substitute: Cornstarch. It actually makes the crust even more crisp and light.
- 2 Large eggs: Why this? The "glue" that holds the breading to the meat.
- Substitute: 1/2 cup heavy cream or buttermilk if you are out of eggs.
- 1.5 cups Panko breadcrumbs: Why this? These are flaky and light, providing a superior "shatter" crunch.
- Substitute: Regular breadcrumbs. The texture will be denser and more like a traditional cutlet.
- 0.5 cup Freshly grated Parmesan cheese: Why this? Adds a salty, savory depth that salt alone can't reach.
- Substitute: Pecorino Romano for a sharper, saltier kick.
- 1 tsp Garlic powder: Why this? Distributes flavor more evenly than fresh garlic in a dry breading.
- Substitute: Onion powder or a pinch of Italian seasoning.
- 0.33 cup Neutral oil: Why this? High smoke point ensures the oil won't burn before the chicken is done.
- Substitute: Light olive oil (not extra virgin, which burns too fast).
| Original Ingredient | Substitute | Why It Works |
|---|---|---|
| Panko Breadcrumbs | Crushed Crackers | High fat content in crackers adds flavor. Note: Reduce added salt. |
| Parmesan Cheese | Nutritional Yeast | Adds a similar nutty, cheesy flavor for dairy-free needs. |
| Fresh Parsley | Dried Parsley | Concentrated flavor. Note: Use 1/3 of the amount of fresh. |
Tools for the Perfect Golden Fry
You don't need a kitchen full of gadgets, but a few specific tools make this much easier. A heavy bottomed skillet is non negotiable for me. I love using my cast iron skillet because it holds heat like a champ. When you drop cold chicken into a thin, cheap pan, the temperature plummets and your crust gets soggy.
- Meat Mallet or Rolling Pin: Essential for getting that even 1/4 inch thickness.
- Shallow Bowls: You need three for your dredging station.
- Wire Cooling Rack: This is the secret to keeping the bottom of the cutlet from getting "sweaty" while you finish the rest of the batch.
- Tongs: Much safer and more precise than a fork for flipping.
Chef's Tip: Freeze your butter for 10 minutes before adding it to the oil. Cold butter solids take slightly longer to brown, giving you a longer window to get that perfect flavor without burning the milk solids.
step-by-step Breaded Chicken Method
- Prep the meat. Slice your 1.5 lbs of chicken breasts horizontally to make thinner cutlets. Place them between two sheets of plastic wrap.
- Pound them thin. Use the flat side of a meat mallet to pound the chicken to a uniform 1/4 inch thickness. Note: This ensures every bite cooks at the same speed.
- Season well. Sprinkle the 0.5 tsp salt and 0.5 tsp black pepper over both sides of the chicken.
- Set up the station. Place 0.5 cup flour in the first bowl. Whisk 2 eggs and 1 tbsp water in the second. Mix 1.5 cups panko, 0.5 cup parmesan, 1 tsp garlic powder, and 1 tbsp parsley in the third.
- The first coat. Dredge each piece of chicken in the flour, shaking off the excess. It should look dusty, not caked.
- The egg bath. Dip the floured chicken into the egg mixture, ensuring no dry spots remain.
- The final crunch. Press the chicken firmly into the panko mixture. Press hard so the crumbs really stick.
- Heat the pan. Add 0.33 cup oil and 2 tbsp butter to a large skillet over medium high heat. Wait until the butter stops foaming.
- Fry until golden. Place 2 cutlets in the pan. Cook for 3 minutes per side until the crust is deep golden and the chicken feels firm.
- Rest and drain. Move the chicken to a wire rack. Let it rest for 3 minutes until the crust sets and the juices redistribute.
Common Mistakes and Professional Fixes
The biggest heartbreak is seeing all that beautiful breading slide right off the chicken and stay in the pan. I've been there. It usually happens because the chicken was too wet before it hit the flour, or because you flipped it too early. Patience is your best friend here.
Let that crust form a solid bond with the meat before you even think about moving it.
Another thing to watch out for is the oil level. If you use too little, the breading will absorb it all and go dry. If you use too much, you're basically deep frying, which is fine, but it can make the cutlet feel heavy. You want the oil to come about halfway up the side of the chicken.
This creates that iconic "fried ring" around the edge that looks so professional.
Troubleshooting Common Issues
| Issue | Solution |
|---|---|
| Why Your Breading Falls Off | This usually happens because of "steam pockets." If the chicken is cold and wet, the steam from the cooking meat pushes the crust away. Always pat your chicken dry with paper towels before you start t |
| Why Your Crust Is Burning | If your breading is black but the chicken is raw, your heat is too high. This is common with the butter oil mix. The butter adds great flavor, but it lowers the smoke point. If it starts smoking, turn |
| Why Your Cutlets Are Soggy | This is almost always due to overcrowding or placing hot chicken directly onto a flat plate. When hot chicken sits on a plate, it creates steam. That steam has nowhere to go but back into the crust. U |
Budget Swaps and Healthier Tweaks
If you are looking to save some money, you can skip the parmesan and add an extra 1/2 tsp of salt and some dried oregano to the breadcrumbs. It’s a slightly different vibe, but it’s still delicious. For a "fancy" feeling on a budget, serve this with a side of simple lemon pasta.
It uses the same lemon you’re already cutting for the wedges!
For those looking for a lighter version, this Lemon Pepper Chicken recipe is a fantastic alternative that skips the heavy breading but keeps all the flavor. You still get that golden exterior, just with less oil.
When scaling this recipe up for a big family Sunday dinner, I usually double everything. But here is the trick: don't double the salt in the breading. Start with 1.5x the amount and taste. You can always add more, but the parmesan is already salty, and you don't want to overdo it.
Scaling for a Crowd:To Double (8 servings): Use 3 lbs chicken. Use 3 eggs instead of 4 (usually enough). Use 1.5x the spices. To Half (2 servings): Use 0.75 lbs chicken. Use 1 egg. Reduce oil to 3 tbsp.
| Original Ingredient | Shortcut | Impact |
|---|---|---|
| Fresh Garlic | Garlic Powder | More even flavor distribution; less chance of burning. |
| Pounding Meat | Buying "Cutlets" | Saves 5 minutes but costs about $1-2 more per pound. |
| Grated Parm | Canned Parm | Budget friendly but doesn't melt; adds a sandier texture. |
Storage and Smart Leftover Ideas
If you actually have leftovers (a rare event in my house), they keep well in the fridge for about 3 to 4 days. The key is how you reheat them. Never use the microwave unless you want a rubbery, sad cutlet.
The best way is to pop them in a toaster oven or air fryer at 350°F (180°C) for about 5 minutes. This brings back the crunch.
Zero Waste Tip: Don't throw away the leftover flour or breadcrumbs that didn't touch the raw chicken. If you have extra "clean" breading, you can toast it in a dry pan and sprinkle it over roasted vegetables the next day. Also, save your lemon rinds!
Toss them into a jar of white vinegar for a week to make a cheap, amazing smelling kitchen cleaner.
You can also freeze these! I prefer freezing them after they are breaded but before they are cooked. Lay them out on a baking sheet to freeze individually, then pop them into a freezer bag. They will stay good for up to 3 months.
To cook, just add an extra 2 minutes per side to the frying time.
Pairing Suggestions and Presentation Ideas
The classic way to serve these is with a big squeeze of fresh lemon and a pile of arugula. The acidity of the lemon cuts right through the richness of the fried crust. It’s simple, it’s elegant, and it takes about thirty seconds to plate.
If you want something heartier, these cutlets are the perfect base for a "fritta" style dish. If you've ever had the Chicken Fritta Olive recipe, you know how well crispy chicken pairs with a creamy pasta sauce. Just lay the cutlet on top of some fettuccine alfredo and watch everyone's eyes light up.
If you want a lighter meal, serve with a vinegar based slaw.If you want a classic Italian dinner, top with marinara and melted mozzarella.If you want a kid friendly option, slice them into "fingers" and serve with honey mustard.
One myth people often believe is that you need a ton of oil to get a crispy result. That's just not true. As long as your pan is hot and your chicken is thin, the shallow fry method uses very little oil. Another myth is that the breading won't stay on without a long chill time in the fridge.
While a 10 minute rest helps, if your dredging technique is solid (flour egg-panko), you can go straight from the bowl to the pan with great results.
Trust your senses while you're cooking. Listen for that consistent sizzle. Look for the edges turning brown before you flip. And most importantly, enjoy the process. There is something incredibly satisfying about turning a few basic ingredients into a meal that feels this special. Happy cooking!

Recipe FAQs
What is the best way to cook chicken breast cutlets?
Shallow frying is best for maximum crispness. Heat 1/4 inch of neutral oil over medium high heat until shimmering, then fry the cutlets for about 3 minutes per side until golden brown.
Do you dip cutlets in egg or flour first?
Flour first, then egg. The initial flour coating (the "dusting") dries the surface of the meat so the egg binder can properly adhere before it hits the final breadcrumb layer.
What do you coat chicken cutlets in for ultimate crispiness?
Use a triple dredge of flour, egg, and Panko mixed with Parmesan cheese. Press the breading firmly onto the meat to ensure it bonds during the initial contact with hot oil.
Why don't my chicken cutlets get crispy?
Your oil temperature is too low, or you are overcrowding the pan. If the oil isn't hot enough, the crust steams instead of frying, leading to soggy results. Check the temperature before adding more chicken.
How do I prevent the breading from falling off while frying?
Pat the chicken completely dry before starting the dredging process. Excess moisture is the primary culprit for separation; if you mastered controlling spread in cookies, the same principle of surface tension applies here.
Can I cook these cutlets ahead of time and reheat them?
Yes, but avoid the microwave for reheating. The best way to revive the crunch is using an air fryer or toaster oven at 350°F for about 5 minutes; this restores the texture better than any other method.
What is a good side dish to balance the richness of fried cutlets?
A bright, acidic vegetable side is ideal for contrast. Something lightly dressed, like a simple Garlic Green Beans recipe, cuts through the fat perfectly.
Crispy Chicken Cutlet Recipe

Ingredients:
Instructions:
Nutrition Facts:
| Calories | 632 calories |
|---|---|
| Protein | 61 g |
| Fat | 28 g |
| Carbs | 32 g |
| Fiber | 2 g |
| Sugar | 1 g |
| Sodium | 765 mg |
