Quick Tofu Meal Prep: High Protein and Crispy
- Time: 10 min active + 10 min cook
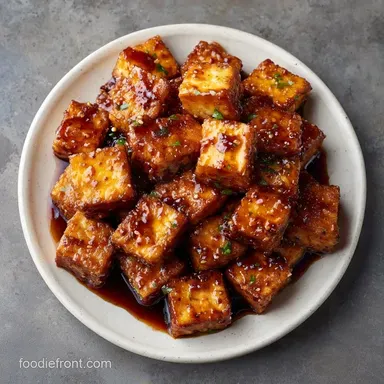
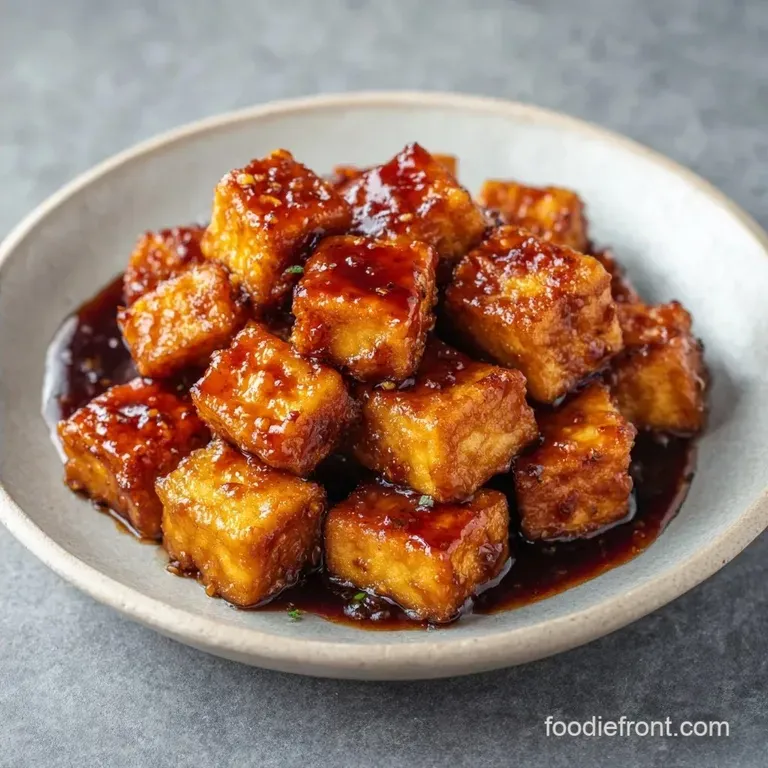
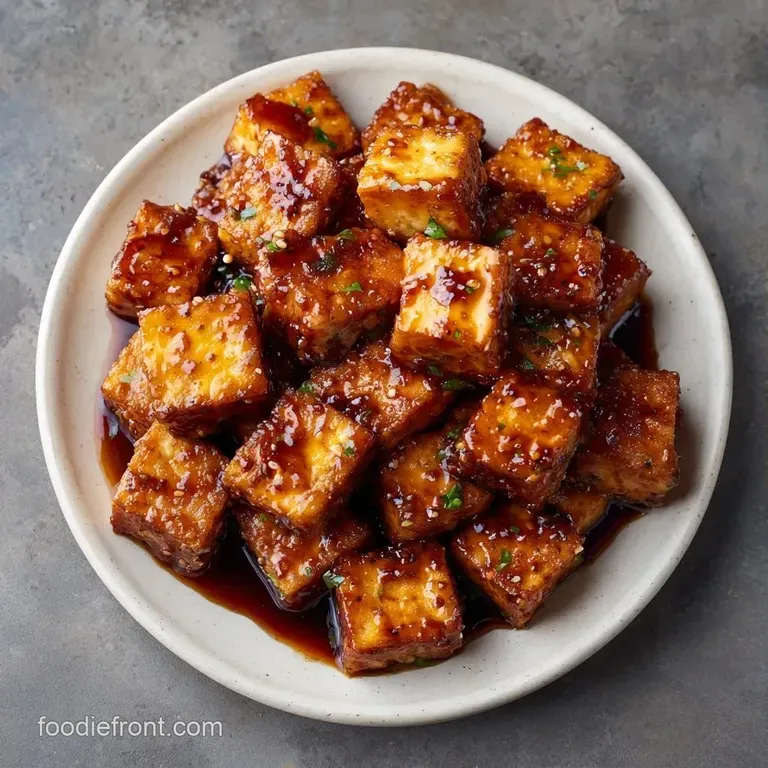
- Flavor/Texture Hook: Sticky, savory glaze with a shatter crisp edge
- Perfect for: Weeknight office lunches or high protein dinner prep
- Quick Tofu Meal Prep for Busy Weeks
- How the Texture Actually Works
- Tofu Component Analysis
- Ingredients and Substitutes
- Essential Gear Needed
- Step-by-Step Instructions
- Pro Tips & Pitfalls
- Adjusting the Batch Size
- Tofu Myths Debunked
- Storage and Zero Waste
- Perfect Pairing Suggestions
- Recipe FAQs
- 📝 Recipe Card
Quick Tofu Meal Prep for Busy Weeks
That sharp, salty sizzle when tofu hits a hot pan is my favorite sound on a Sunday afternoon. There is something about the way the edges turn golden brown that makes me feel like I actually have my life together for the coming week.
For a long time, I hated tofu because I always ended up with these bland, rubbery cubes that tasted like nothing but the water they sat in.
I used to spend an hour pressing the tofu under heavy books, which is honestly a waste of time when you're trying to get dinner on the table. Then I realized the secret isn't in how much water you squeeze out, but in how you coat the outside.
This Quick Tofu Meal Prep focuses on a thin cornstarch layer that creates a barrier, allowing the sauce to cling to the tofu without making it mushy.
If you've been struggling with plant based proteins that feel like a chore to eat by Wednesday, this is for you. We're aiming for a texture that stays firm and a flavor that's deeply savory. It's a hearty, comforting meal that doesn't require a dozen different pans or a culinary degree to pull off. Let's get into it.
How the Texture Actually Works
Starch Barrier: Cornstarch absorbs surface moisture and creates a thin, crisp shell that prevents the tofu from absorbing too much oil.
High Heat Searing: Using 200°C allows the exterior to brown quickly, locking in the structure before the inside gets too soft.
Sugar Reduction: The maple syrup and soy sauce simmer together for 60 seconds, creating a thick syrup that coats rather than soaks.
Fat Distribution: Drizzling oil directly onto the starch coated cubes ensures every side hits the pan with a thin layer of fat for a more even sear.
| Method | Time | Texture | Best For |
|---|---|---|---|
| Air Fryer | 10 mins | Very crispy, drier | Hands off cooking |
| Skillet | 8-10 mins | Golden, silkier | Maximum flavor control |
| Oven | 20-25 mins | Firm, uniform | Huge batches |
Tofu Component Analysis
| Ingredient | Science Role | Pro Secret |
|---|---|---|
| Extra Firm Tofu | Structural Base | Use a brand with a denser feel to avoid crumbling |
| Cornstarch | Moisture Buffer | Toss in a bowl, don't sprinkle over the pan |
| Maple Syrup | Glaze Binder | Provides the "stick" that holds the garlic to the tofu |
| Avocado Oil | Heat Transfer | High smoke point prevents the starch from burning |
Ingredients and Substitutes
For this recipe, I use a simple mix of pantry staples. Trust me, don't bother with low-fat soy sauce here, as the salt is what carries the ginger and garlic.
- 14 oz extra firm tofu, cubed Why this? Keeps its shape during the sear
- 2 tbsp cornstarch Why this? Creates the necessary crispy crust
- 1/2 tsp garlic powder Why this? Adds depth to the crust itself
- 1/2 tsp salt Why this? Draws out surface moisture
- 1 tbsp avocado oil Why this? Handles high heat without smoking
- 3 tbsp low sodium soy sauce Why this? Balanced saltiness for meal prep
- 1 tbsp maple syrup Why this? Natural sweetness and thickens the glaze
- 1 tsp toasted sesame oil Why this? Adds a nutty, aromatic finish
- 1 tsp fresh ginger, grated Why this? Sharp, fresh contrast to the syrup
- 2 cloves garlic, minced Why this? Classic savory base
- 1 tsp sriracha Why this? Subtle heat to cut through the sweetness
Substitution Table
| Original Ingredient | Substitute | Why It Works |
|---|---|---|
| Extra Firm Tofu | Tempeh (cubed) | Firmer texture. Note: Needs slightly more soy sauce |
| Maple Syrup | Honey | Similar viscosity. Note: Not vegan |
| Avocado Oil | Grapeseed Oil | High smoke point. Note: Neutral flavor |
| Soy Sauce | Tamari | gluten-free. Note: Slightly saltier profile |
Right then, let's talk about the gear. You don't need much here. If you're doing the air fryer route, any basket style works. For the skillet, a non stick or cast iron is best. I personally use a large stainless steel pan because it gives me those deep brown bits that add so much flavor.
Essential Gear Needed
- Large mixing bowl (for tossing the tofu)
- Paper towels (essential for drying)
- Non stick skillet or Air Fryer
- Small whisk or fork (for the glaze)
- Airtight glass containers (better for reheating than plastic)
Step-by-step Instructions
- Drain the tofu and pat it dry with a paper towel. Cut into 1/2 inch cubes. Note: The drier the surface, the better the crunch.
- In a large bowl, toss the tofu cubes with cornstarch, garlic powder, and salt until evenly coated.
- Drizzle the avocado oil over the tofu and toss again to ensure a light coating.
- For Air Fryer: Arrange tofu in a single layer and cook at 200°C for 10 minutes, shaking halfway through. For Skillet: Sear over medium high heat for 2-3 minutes per side until the edges are browned and feel firm.
- Whisk together soy sauce, maple syrup, sesame oil, grated ginger, minced garlic, and sriracha in a small bowl.
- Pour the glaze over the hot tofu immediately after cooking. Toss for 30-60 seconds until the sauce thickens into a sticky coating.
- Divide the tofu equally among 4 containers.
- Pair with cooked brown rice and steamed vegetables. Note: Let the tofu cool for 5 mins before closing the lid to prevent steaming.
Pro Tips & Pitfalls
If you've ever had tofu that turned into a soggy sponge by Tuesday, you're probably glazing too early or closing your containers while the food is still steaming. When you trap steam in a plastic box, it turns into water droplets that soak right back into that beautiful crust we just made.
Another thing I've learned the hard way: don't overcrowd the pan. If the tofu cubes are touching too much, they'll steam instead of sear. Give them some breathing room. It's better to do two batches than one giant, mushy mess.
Why Your Tofu Is Soggy
This usually happens because of excess water in the tofu or the sauce. If you don't pat the cubes dry, the cornstarch turns into a paste rather than a powder, which prevents it from crisping up. Also, check your heat; if the pan isn't sizzling when the tofu hits, you're just boiling it in oil.
Why Your Sauce Is Watery
A watery glaze means it didn't reduce. The maple syrup needs to hit the heat of the pan to activate its thickening properties. If you just pour the sauce over cold tofu, it will stay thin and pool at the bottom of your meal prep container.
| Problem | Root Cause | Solution |
|---|---|---|
| Tofu sticking to pan | Pan not hot enough | Wait for oil to shimmer before adding tofu |
| Sauce tastes too salty | Soy sauce reduction | Add a squeeze of lime juice to balance |
| Tofu is too soft | Used silken tofu | Use only extra firm or super firm tofu |
Common Mistakes Checklist
- ✓ Did you pat the tofu dry with paper towels?
- ✓ Is the oil shimmering before the tofu goes in?
- ✓ Did you allow the sauce to bubble and thicken for 60 seconds?
- ✓ Did you let the food cool slightly before sealing the lid?
- ✓ Did you avoid overcrowding the skillet?
Adjusting the Batch Size
When I'm cooking for just myself, I halve the recipe. Use a smaller pan so the oil doesn't spread too thin, and reduce the sear time by about 20% since there's less moisture releasing into the pan. If you're making a massive batch for the whole family, work in batches.
For a 4x batch, don't quadruple the salt or sriracha. I usually go to 1.5x for the spices and soy sauce, then taste and adjust. Liquids can be scaled linearly, but salt can get overwhelming quickly in larger volumes.
If you're using an oven to scale up, lower the temp to 175°C and extend the time to about 25 mins to ensure the middle of the tray gets as crispy as the edges.
If you want a different flavor profile for your high protein tofu meal prep, you can swap the dry rub. I sometimes use my rotisserie chicken seasoning for a more savory, herb forward crust before adding the glaze.
Tofu Myths Debunked
Myth: You must press tofu for hours. Truth: While pressing helps, it's not mandatory if you use extra firm tofu and a cornstarch coating. Patting dry with a towel takes 30 seconds and gets you 90% of the way there for a Quick Tofu Meal Prep.
Myth: Tofu has no flavor. Truth: Tofu is a sponge. It doesn't have a strong flavor, which is actually its superpower. It takes on whatever you pair it with, whether that's this sticky glaze or a punchy habanero tomato hot sauce.
Storage and Zero Waste
Store your meal prep in airtight glass containers in the fridge for up to 4 days. I prefer glass because it doesn't hold onto the soy sauce smell and reheats more evenly in the microwave.
If you need it to last longer, you can freeze the cooked tofu for up to 2 months, though the texture will be slightly softer after thawing.
To reheat, I suggest a quick 2 minute zap in the microwave, but for the best results, toss the cubes back into a hot skillet for 3 minutes. This brings back that shatter crisp edge that the microwave tends to kill.
For zero waste, don't toss the tofu packaging water if it's just the brine. While most people dump it, some use it in composting. More importantly, use the stems of your ginger and garlic. I throw any leftover ginger scraps into a freezer bag and use them to flavor a quick stock or tea.
Perfect Pairing Suggestions
To make this a complete Tofu meal prep lunch, you need a balance of grains and greens. I usually go with brown rice or quinoa for a nuttier flavor that stands up to the sticky glaze. For vegetables, steamed broccoli, snap peas, or sautéed bok choy are the way to go.
If you're feeling fancy, add some pickled carrots or sliced cucumbers on the side. The acidity of the pickles cuts through the sweetness of the maple syrup, making every bite feel fresh. You can also sprinkle some toasted sesame seeds or chopped scallions on top right before serving to add a bit of crunch and color.
For those who need more guidance on the nutritional side, according to USDA FoodData, soy based proteins provide a complete amino acid profile, making this an excellent choice for those skipping meat. Pair it with a side of kimchi for a probiotic boost that complements the savory notes of the soy and ginger.
Recipe FAQs
What are some easy meal prep ideas for a busy week?
Prepare batches of crispy tofu with brown rice and steamed vegetables. This recipe takes only 20 minutes total and stays fresh in the fridge for up to 4 days.
How to get the tofu extra crispy for meal prep?
Pat the cubes completely dry before tossing them in cornstarch. This removes surface moisture, allowing the tofu to crisp effectively at 400°F (200°C) in an air fryer or in a skillet.
Is tofu meal prep a good source of high protein?
Yes, extra firm tofu is an excellent plant based protein source. Pairing it with brown rice creates a complete amino acid profile for better satiety and muscle recovery.
Can this tofu meal prep help with weight loss?
Yes, it is a calorie conscious option at 163 kcal per serving. Using avocado oil and low-sodium soy sauce keeps the nutrient density high while limiting excess calories.
Is quick tofu meal prep considered healthy?
Yes, it utilizes whole ingredients like fresh ginger and garlic. For a balanced meal, pair the tofu with a side of homemade slaw for added fiber.
How to prep this tofu meal with rice?
Divide the glazed tofu equally among four containers over cooked brown rice. Add steamed vegetables to each portion to ensure a balanced meal throughout the week.
Is it true that microwave reheating ruins the tofu texture?
No, this is a common misconception. While a microwave is fast, tossing the cubes back into a hot skillet for 3 minutes restores the original shatter crisp edges.
Quick Tofu Meal Prep