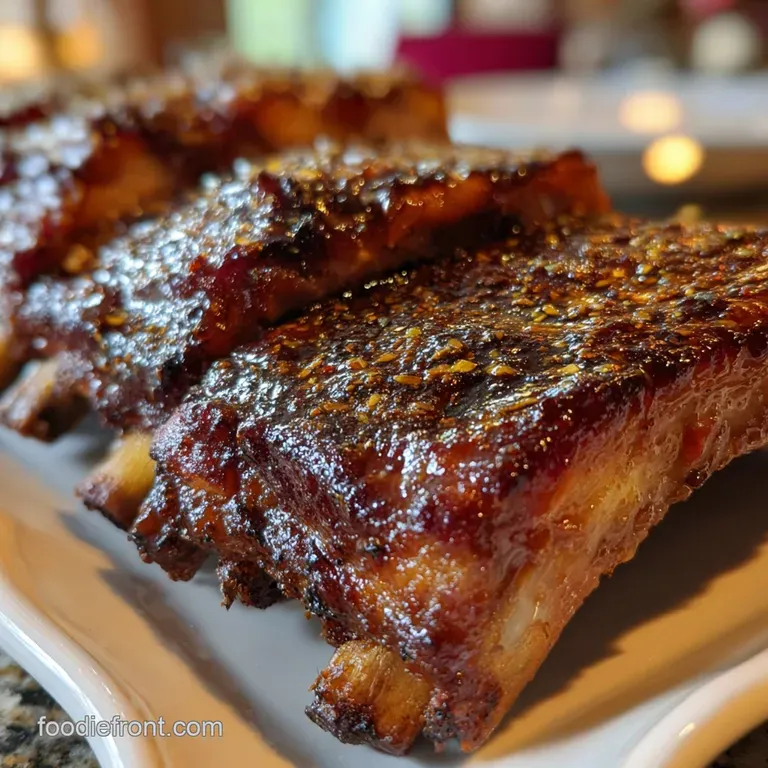
Smoked Ribs: Tender Bbq Treasures
- Time: Active 30 minutes, Passive 4 hours, Total 4 hours 30 mins
- Flavor/Texture Hook: Smoky, pull apart tender meat with a savory, caramelized bark
- Perfect for: Weekend family gatherings or a dedicated Sunday dinner
- The Hearty Family Secret to Better Smoked Ribs
- The Science of Smoke and Tender Meat
- Component Analysis of Key Ingredients
- Choosing Quality Ingredients for the Best Flavor
- Must Have Equipment for Backyard Cooking Success
- Simple Steps to Get Pull Apart Ribs
- Solving Common Problems and Avoiding Dry Ribs
- Fun Flavor Twists for Your Next Cookout
- Safe Storage and Reheating for Busy Families
- Hearty Side Dishes for Your Family Dinner
- Three Precision Checkpoints
- If You Want X, Do Y
- Debunking Common Kitchen Myths
- Very High in Sodium
- Recipe FAQs
- 📝 Recipe Card
The Hearty Family Secret to Better Smoked Ribs
There is nothing quite like the smell of a smoker waking up on a Saturday afternoon. That first curl of blue smoke drifting across the yard always brings the neighbors over the fence, asking what is on the menu.
I remember the first time I tried making Smoked Ribs for my dad’s birthday; I was so nervous about them being tough, but the moment I saw that pink smoke ring under the bark, I knew I had found something special.
It is about the patience of the process and the way the kitchen feels once that meat has been resting and the family gathers around the table.
We are not doing anything fancy or complicated here. This is real world cooking for people who love to eat well without spending a fortune on "gourmet" gear. We take 2.5 racks of baby back ribs and treat them with a simple mustard binder and a rub that likely lives in your pantry right now.
You do not need to be a professional pitmaster to get that satisfying, tender result. We are going for meat that stays on the bone until you take a bite, then releases with just the slightest tug exactly how a hearty dinner should be.
This recipe is my go to because it is reliable and focuses on the basics that actually work. Whether you are using a pellet grill or a classic offset smoker, the principles of heat and moisture remain the same.
I have made plenty of mistakes, like skipping the rest time or over seasoning with salt, so I have tailored this guide to help you skip those pitfalls. Let’s get the fire started and make something your family will be talking about for weeks.
The Science of Smoke and Tender Meat
The Collagen to Gelatin Pivot
Thermodynamic Breakdown: Tough connective tissue begins to dissolve into silky gelatin around 71°C (160°F), which provides that signature velvety mouthfeel.
This process requires time and steady heat to ensure the fibers soften without the moisture evaporating too quickly.
- Smoke Adhesion: Smoke particles are attracted to cold, moist surfaces, which is why we apply the mustard binder and keep the meat chilled until it hits the grates.
- The Maillard Reaction: The combination of brown sugar and heat creates a complex, dark crust known as "bark" that seals in the savory juices.
- Hygroscopic Action: Salt in the rub draws moisture to the surface, which then re absorbs as a concentrated brine, seasoning the meat deep inside.
- The Texas Crutch: Wrapping the ribs in foil creates a small steam chamber that speeds up the breakdown of collagen, effectively "braising" the meat in its own juices.
| Thickness of Rack | Internal Temperature | Rest Time | Visual Cue |
|---|---|---|---|
| 2.5 cm (Standard) | 93°C - 95°C | 15 minutes | Meat pulls back 1 cm from bone |
| 3.5 cm (Meaty) | 94°C - 96°C | 20 minutes | Rack "cracks" when lifted in middle |
| 1.5 cm (Lean) | 90°C - 92°C | 10 minutes | Toothpick slides in like soft butter |
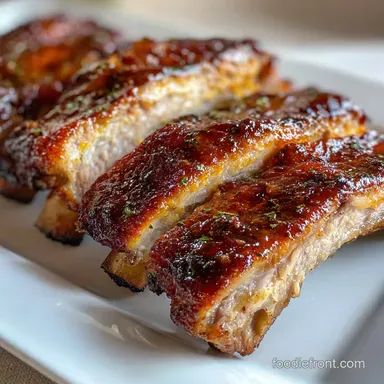
The "bend test" is the most reliable way to know your Smoked Ribs are ready for the table. When you lift the rack with tongs from the center, it should bow deeply and the bark should start to crack, but the rack shouldn't break completely in half. This shows the fats have rendered but the structure is still there. If you love this deep, savory profile, you might also enjoy the richness of my Beef Italian Sausage recipe for your next cookout.
Component Analysis of Key Ingredients
| Ingredient | Science Role | Pro Secret |
|---|---|---|
| Yellow Mustard | Protein Binder | The vinegar softens the surface proteins but the mustard flavor disappears during the long cook. |
| Brown Sugar | Caramelization | Use "dark" brown sugar for a higher molasses content, which creates a stickier, more flavorful bark. |
| Apple Cider Vinegar | Acidic Tenderizer | It breaks down the surface fibers in the spray phase, helping the smoke penetrate deeper into the meat. |
| Smoked Paprika | Color and Depth | This provides that deep mahogany hue even before the smoke has fully set in. |
Choosing Quality Ingredients for the Best Flavor
To get the best results, start with fresh meat and spices that haven't been sitting in the back of the cupboard for three years. Since we are being budget smart, we use yellow mustard as our binder it is much cheaper than expensive oils or specialty binders and does the job better. If you find yourself wanting a different texture entirely, like a quick sear on a weeknight, you should look at my Pan Seared Steak Recipe for a faster beef fix.
- 2.5 racks Baby Back Ribs (6.25 lbs total): Look for racks with even thickness so they cook at the same rate.
- Substitute: St. Louis Style ribs (add 1 hour to cook time).
- 0.25 cup Yellow Mustard: Why this? Acts as a glue for the rub without adding fat.
- Substitute: Olive oil or a light coating of water.
- 0.25 cup Brown Sugar, packed: Why this? Essential for that sweet, dark crust.
- Substitute: Coconut sugar or maple sugar.
- 2 tbsp Smoked Paprika: Why this? Adds a earthy base and vibrant color.
- Substitute: Regular paprika with a drop of liquid smoke.
- 1 tbsp Coarse Black Pepper: Why this? Provides the "bite" that cuts through the fat.
- Substitute: White pepper (use half the amount).
- 1 tbsp Kosher Salt: Why this? Large grains dissolve slowly and season evenly.
- Substitute: Sea salt (use slightly less by volume).
- 1 tsp Garlic Powder & 1 tsp Onion Powder: Why this? Adds savory "umami" notes to the rub.
- Substitute: Granulated versions work fine.
- 0.5 tsp Cayenne Pepper: Why this? Just enough heat to balance the sugar.
- Substitute: Chili powder for a milder finish.
- 0.5 cup Apple Juice & 0.25 cup Apple Cider Vinegar: Why this? Keeps the meat moist and helps set the bark.
- Substitute: Pineapple juice for a tropical twist.
- 1 cup BBQ Sauce: Why this? Provides the final glossy finish.
- Substitute: A mix of ketchup, honey, and hot sauce.
Must Have Equipment for Backyard Cooking Success
You do not need a five thousand dollar setup to make incredible food. I started on a basic charcoal kettle and it taught me everything I know about fire management. The most important thing is having a reliable way to measure the temperature of your pit and your meat.
If you are ever curious about how different cooking methods stack up, consider this comparison for your ribs:
| Method | Texture | Time | Best For |
|---|---|---|---|
| Stovetop (Braising) | Very soft, no crust | 2 hours | Quick midweek meals |
| Oven (Roasting) | Firm, decent crust | 3 hours | When it's raining outside |
| Smoker (This Recipe) | Barky, smoky, tender | 4 hours | Weekend family gatherings |
Necessary Cooking Tools
- The Smoker: Whether it's a Traeger, a Big Green Egg, or a simple offset, you need indirect heat.
- Heavy Duty Aluminum Foil: Essential for the "Texas Crutch" phase to prevent tearing.
- Spray Bottle: A simple plastic mister for your apple juice mixture.
- Instant Read Thermometer: This is the only way to be 100% sure about doneness without cutting into the meat.
Chef's Tip: Use a "mop" or a high-quality spray bottle to keep the surface of the ribs damp. Smoke doesn't stick to dry surfaces, so keeping them slightly tacky ensures a deeper flavor profile.
Simple Steps to Get Pull Apart Ribs
- Prep the meat. Remove the silver skin (membrane) from the back of the 2.5 racks of ribs using a paper towel for grip. Note: This allows the rub and smoke to penetrate the meat from both sides.
- Apply the binder. Slather the 0.25 cup yellow mustard over both sides of the ribs until they are completely coated in a thin yellow film.
- Season the racks. Mix the brown sugar, paprika, pepper, salt, garlic, onion, and cayenne, then sprinkle generously over the ribs. Note: Pat the rub in gently; do not rub it, or you will clump the spices.
- Fire up the smoker. Preheat your smoker to 107°C (225°F) using fruitwood like apple or cherry.
- Start the smoke. Place the ribs bone side down on the grates and smoke for 2 hours until the rub has set and doesn't smear when touched.
- Mist the meat. Every 45 minutes, spray the ribs with the apple juice and vinegar mixture until the surface looks glistening and wet.
- Wrap for tenderness. Lay out two large sheets of foil, place the ribs inside, add a splash more juice, and seal tightly. Note: This is the "Texas Crutch" that breaks down tough fibers quickly.
- Continue cooking. Place the wrapped ribs back in the smoker for another 1 hour 30 mins until the internal temperature hits 91°C (195°F).
- Glaze the surface. Carefully unwrap the ribs, brush on the 1 cup of BBQ sauce, and cook uncovered for another 15-30 minutes until the sauce is tacky and bubbling.
- Rest before serving. Let the ribs sit on a cutting board for 15 minutes until the juices redistribute through the meat.
Solving Common Problems and Avoiding Dry Ribs

Why Your Smoked Ribs Feel Tough
If the meat is clinging to the bone like its life depends on it, you likely pulled them off too early. Even if they "look" done, the collagen hasn't had enough time to melt. This is why we use the 3-2-1 or 2-1.5-0.5 timing methods. You need that wrapped phase to steam the meat into submission.
Fixing the Bitter Flavor
If your ribs taste like an ashtray, your smoke wasn't "clean." You want thin, blue smoke, not thick, white, puffy clouds. White smoke is the result of restricted oxygen and creates creosote, which tastes bitter. Open your vents a bit more to let the fire breathe. For another method that avoids the smoke entirely while keeping things tender, try my Sous Vide Short Ribs recipe.
| Problem | Root Cause | Solution |
|---|---|---|
| Dry, crumbly meat | Overcooked past 96°C | Pull the ribs at 93°C and let carryover heat finish them. |
| Rub didn't form bark | Too much moisture/spritzing | Allow the rub to "set" for the first 90 minutes before spraying. |
| Searing hot but tough | Temperature too high | Stick to 107°C (225°F); low and slow is mandatory for baby backs. |
Common Mistakes Checklist
- ✓ Forgot to remove the membrane (leads to a "rubbery" texture on the bottom).
- ✓ Opening the lid too often (if you're looking, you're not cooking!).
- ✓ Using green or wet wood (creates bitter, acrid smoke).
- ✓ Not resting the meat (all the moisture will run out on the cutting board).
- ✓ Forgetting to calibrate the smoker's built in thermometer (they are often 25 degrees off).
Fun Flavor Twists for Your Next Cookout
- The Memphis Dry Style: Skip the BBQ sauce at the end. Instead, apply a second layer of the dry rub 15 minutes before taking them off the smoker. This creates a crusty, savory exterior that isn't messy.
- The Spicy Carolina Swap: Replace the apple juice with a vinegar based pepper sauce for your spritz. This adds a sharp tang that cuts through the fatty baby back ribs perfectly.
- Coffee Rub Variation: Add 1 tablespoon of finely ground espresso to your dry rub. It adds a dark, earthy complexity that makes the pork taste incredibly rich.
Scaling the Recipe
- To Feed a Crowd (Double or Triple): You can fit more racks by using a rib rack (which stands them vertically). Keep the salt and cayenne to 1.5x the original amount to avoid over seasoning, as spices don't always scale linearly.
- Cooking for Two (Half Recipe): If you are only doing one rack, keep the temperature the same but start checking for doneness 30 minutes earlier. Small racks can dry out faster because they have less thermal mass.
Safe Storage and Reheating for Busy Families
Storage Guidelines Keep your leftover Smoked Ribs in an airtight container in the fridge for up to 4 days. If you want to keep them longer, wrap individual portions in plastic wrap and then foil before placing them in a freezer bag; they will stay good for 3 months.
Reheating Without Drying Out Never use the microwave if you can help it! The best way to reheat ribs is in the oven at 120°C (250°F).
Place the ribs in a baking dish with a splash of apple juice or water, cover tightly with foil, and heat for 20 minutes. This steams them back to life without turning the meat into rubber.
Zero Waste Tip If you have leftover rib meat that isn't enough for a full meal, pull it off the bone and use it for "Rib Tacos" or stir it into a pot of beans. The smoky fat from the ribs will season an entire pot of chili or baked beans better than any store-bought bacon could.
Hearty Side Dishes for Your Family Dinner
When it comes to Smoked Ribs, the sides should be just as comforting as the main event. In our house, that usually means a big bowl of creamy coleslaw to provide a cold, crunchy contrast to the hot, fatty meat.
A vinegar based potato salad is another great option because the acidity helps "reset" your palate between those rich, smoky bites.
- Cornbread with Honey: The sweetness of the corn mirrors the brown sugar in the rib rub.
- Smoked Mac and Cheese: If the smoker is already on, throw a pan of cheesy pasta in there for the last 45 minutes.
- Grilled Corn on the Cob: Char the corn right next to the ribs during the final glazing phase for a smoky vegetable side.
Don't overthink the presentation. These ribs are meant to be eaten with your hands, surrounded by family and plenty of paper towels. The joy of this recipe is in the shared experience of a long cook and the messy, happy faces at the end of the meal. It is honest, hardworking food that never fails to hit the spot.
Three Precision Checkpoints
- The 2 Hour Mark: Check that the rub has "set" on the meat. It should look dark and matte, not wet or pasty.
- 91°C (195°F): This is the internal temperature where the "Texas Crutch" has done its work and the ribs are ready to be glazed.
- The 15 Minute Rest: Do not skip this. If you cut them immediately, the internal steam will escape, leaving you with dry meat.
If You Want X, Do Y
- If you want maximum smoke flavor, do not wrap the ribs in foil, but be prepared for a longer cook time (about 5-6 hours total).
- If you want "Fall Off-The Bone" tenderness, extend the foil wrapped phase by an additional 30-45 minutes.
- If you want a crispy, charred exterior, finish the glazed ribs over high direct heat for 2 minutes per side at the very end.
Debunking Common Kitchen Myths
- Myth: Searing meat seals in juices. Truth: Searing actually causes moisture loss due to high heat, but it creates flavor through the Maillard reaction. We smoke low and slow to preserve moisture, not "seal" it.
- Myth: You must boil ribs before smoking. Truth: Boiling ribs actually leaches out all the flavor into the water. If you want tender ribs, use the foil wrap method (Texas Crutch) instead of boiling.
- Myth: The smoke ring indicates flavor. Truth: The pink ring is a chemical reaction between nitrogen dioxide and myoglobin. While it looks beautiful and professional, it doesn't actually contribute to the smoky taste that comes from the surface deposits of the smoke itself.

Very High in Sodium
1940 mg mg of sodium per serving (84% of daily value)
The American Heart Association recommends limiting sodium intake to about 2,300mg per day.
Tips to Reduce Sodium in Your Ribs
-
Reduce Added Salt-25%
The recipe uses 1 tbsp of Kosher salt. Reduce it by half, to 0.5 tbsp, or eliminate it entirely and rely on other flavorings. This will significantly reduce the sodium content.
-
Low-Sodium BBQ Sauce-20%
BBQ sauce is a significant source of sodium. Use a low-sodium or sodium free BBQ sauce. Alternatively, make your own BBQ sauce from scratch to control the sodium levels.
-
Spice It Up, Not Salt It Up!-15%
Enhance the flavor with more smoked paprika, black pepper, garlic powder, onion powder, and cayenne pepper. Experiment with different combinations to create a robust flavor profile without relying on salt.
-
Homemade Apple Juice-5%
Ensure your apple juice is 100% juice with no added sodium. Consider using freshly squeezed apple juice for the purest flavor and to avoid any hidden sodium. Check the label carefully if purchasing store-bought apple juice.
-
Herbs & Spices
Experiment with fresh and dried herbs like thyme, rosemary, or oregano to boost flavor. These add complexity without adding sodium.
Recipe FAQs
What is the 3:2:1 rule for smoking ribs?
It's a guideline, not a strict rule. The 3:2:1 method suggests smoking ribs for 3 hours, then wrapping them for 2 hours, and finally unwrapping for 1 hour. This timing helps break down connective tissue for tenderness. You might adjust times based on rack thickness and desired texture, similar to how Easy Baked Chicken Breast Recipe: Succulent & Juicy requires watching for specific doneness cues.
How long do ribs take at 225 in a smoker?
Expect around 4-5 hours, but watch for doneness. At 225°F (107°C), baby back ribs typically take 4-5 hours. The crucial part is checking for tenderness with a probe or by lifting the rack; it should bend easily and meat should pull back from the bone. If you enjoy this slow cooking technique, you might also master the principles of temperature control for our Bone-in Turkey Breast Recipe in the Oven with Herbs: Oven Only.
Is it better to smoke ribs at 225 or 250?
225°F is generally preferred for ultimate tenderness. Smoking at 225°F (107°C) allows connective tissues to break down more slowly and completely, resulting in more tender ribs. While 250°F (121°C) cooks them faster, it risks drying them out if you're not careful.
Is 250 degrees too hot to smoke ribs?
It can be, but manageable with attention. 250°F (121°C) is on the hotter side for smoking ribs and can lead to them drying out if you aren't vigilant about moisture. If you're a beginner, sticking closer to 225°F (107°C) is safer for that melt-in-your mouth texture. For a quick and satisfying side that complements the smoky flavor, consider our Easy Homemade Coleslaw Recipe: Lasting Crunch.
Do you need to wrap ribs when smoking?
Wrapping is highly recommended for tenderness. Wrapping ribs in foil or butcher paper, often called the "Texas Crutch," creates a steamy environment that accelerates the breakdown of tough connective tissues, leading to more tender results.
Without wrapping, you might need a significantly longer cook time and risk drying out the meat.
What temperature should ribs be when they are done?
Aim for 195-205°F (90-96°C) internal temperature. Ribs are typically done when they reach an internal temperature between 195°F and 205°F (90-96°C). At this point, the collagen has rendered into gelatin, making the meat incredibly tender and pull apartable.
Don't rely solely on temperature; check for probe tenderness as well.
How do you make sure ribs are not tough?
Low and slow cooking with moisture is key. Toughness in ribs usually comes from undercooked collagen. Ensure you're cooking at a consistent low temperature (around 225°F/107°C) for a sufficient amount of time, and don't skip the wrapping phase (like the Texas Crutch) to keep them moist. If you enjoyed mastering the patience of slow cooking here, you might find similar satisfaction in the controlled technique of our Dry Soup Mix: Earthy & Velvety Recipes for building deep flavor.
Smoked Ribs Recipe
Ingredients:
Instructions:
Nutrition Facts:
| Calories | 1385 kcal |
|---|---|
| Protein | 86 g |
| Fat | 94 g |
| Carbs | 46 g |
| Fiber | 2 g |
| Sugar | 39 g |
| Sodium | 1940 mg |
