Cake of Candy: No-Bake Masterpiece
- Time: Active 45 minutes, Passive 0 minutes, Total 45 minutes
- Flavor/Texture Hook: A mix of velvety dark chocolate, chewy fruit leather, and a satisfying crunch from roasted almonds
- Perfect for: Milestone birthdays, graduation parties, or as a centerpiece for a high energy celebration
- Designing the Most Colorful and Impressive Cake of Candy Ever
- Why This Sugar Loaded Masterpiece Steals Every Single Party
- Analytical Deep Dive Into Core Components
- Handpicked Ingredients for a Structurally Sound Sugar Tower
- Essential Tools to Build Your Architecture of Sweetness
- Constructing Your Masterpiece Step by Step With Precision
- Navigating Sticky Situations and Common Construction Errors
- Adapting the Tower Size for Any Crowd
- Common Misconceptions About Sugar Structures
- Keeping Your Sweet Creation Fresh for Future Snacking
- Refreshing Companions to Balance Out the Intense Sweetness
- Recipe FAQs
- 📝 Recipe Card
Designing the Most Colorful and Impressive Cake of Candy Ever
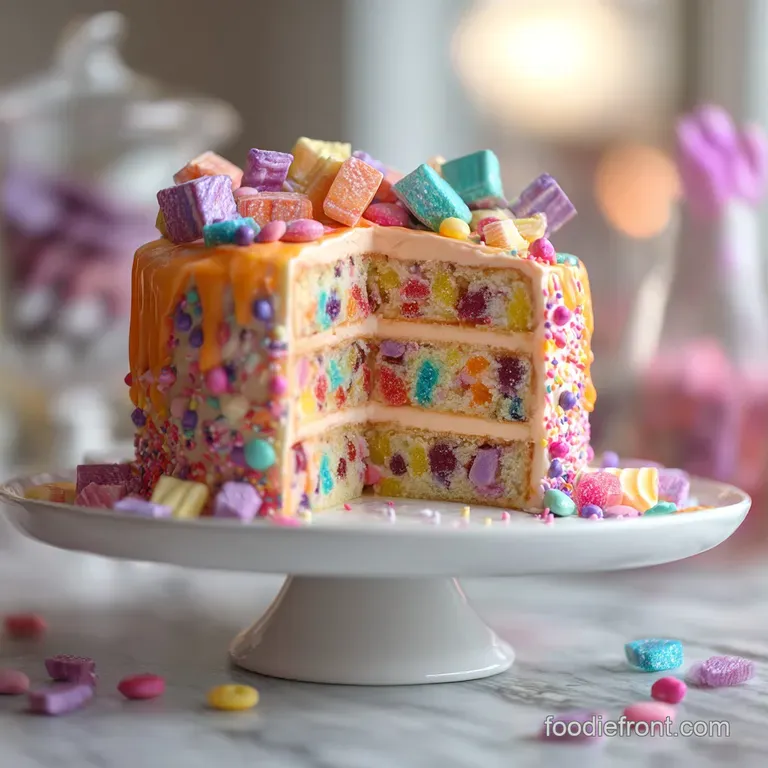
Imagine the look on a kid's face or let's be real, any adult with a serious sweet tooth when you walk into the room carrying a three tier tower that isn't made of sponge and frosting, but literally dripping in gummy bears and chocolate batons.
I remember the first time I tried building a cake of candy for my nephew's tenth birthday. I thought I could just "stack and hope," but halfway through the party, the middle tier started sliding like a slow motion tectonic shift.
It was a sugary disaster, but it taught me everything about the "edible glue" you actually need to keep things upright.
We aren't just piling bags of sweets into a heap here. This is about architecture. When you peel back the vibrant fruit leather or snap off a dark chocolate baton, you want that satisfying tactile experience. No more soggy cake layers or dry crumbs; this is pure, unadulterated joy.
It's the kind of project where you can get your hands a little sticky and let your inner child take the wheel while still creating something that looks professional enough to be a retail window display.
But before we start sticking gummy bears to foam, we have to talk about the "why." Why does this work better than just a bowl of candy? It's the presentation. This recipe turns individual snacks into a singular, impressive monument.
We’re using a specific honey sugar mixture that acts as a tacky, food safe adhesive. It’s much more reliable than frosting, which can get greasy and cause your decorations to slip. Plus, it tastes way better than using a hot glue gun (which, yes, some people actually do please don't).
Why This Sugar Loaded Masterpiece Steals Every Single Party
- Structural Adhesion: The honey and powdered sugar create a high viscosity "syrup" that hardens slightly upon contact with air, acting as a tacky anchor for heavy chocolate batons.
- Vapor Barrier: Using fruit leather strips as a base wrap prevents moisture from the air from seeping into the Styrofoam or cardboard tiers, keeping the exterior candy crisp.
- Tension and Friction: Wrapping the tiers tightly with fruit strips creates a high friction surface, making it easier for secondary layers of candy to "grip" the sides without sliding.
- Osmotic Balance: Choosing freeze dried strawberries provides a sharp, tart contrast that cuts through the heavy sugar content, preventing "flavor fatigue" after the first bite.
Serving Size and Construction Calculator
| Servings | Tiers Needed | Base Board Size | Total Candy Weight |
|---|---|---|---|
| 5-8 people | 1 Tier (8 inch) | 10 inch | Approx. 1.5 lbs |
| 15 people | 3 Tiers (6, 8, 10 inch) | 12 inch | Approx. 3.5 lbs |
| 30+ people | 5 Tiers (Graduated) | 16 inch | Approx. 7-8 lbs |
Choosing the right base is the difference between a sturdy tower and a leaning mess. For a standard 15 serving cake of candy, the 12 inch cake board provides exactly enough "yard space" to catch any loose gummy bears and hold your fruit lollipops at a jaunty angle.
If you go any smaller, the whole thing looks cramped and loses that "wow" factor.
The Physics of Sticky Bonds
To make a cake of candy that doesn't collapse, you have to understand the "tack point." When you mix honey with powdered sugar, you are essentially creating a cold process caramel. The sugar crystals dissolve just enough into the honey to create a thick, stringy paste.
Unlike corn syrup, which stays liquid and runny, this mixture sets into a firm, tacky bond that can hold the weight of a chocolate baton even on a vertical surface. It's essentially edible mortar.
Analytical Deep Dive Into Core Components
| Component | Science Role | Pro Secret |
|---|---|---|
| Honey (0.5 cup) | Primary Adhesive | Microwave for 10 seconds to make it spreadable without losing its "stick." |
| Powdered Sugar (0.25 cup) | Thickening Agent | Sift it first to avoid lumps that create "air pockets" in your glue. |
| Dark Chocolate Batons | Vertical Support | Use these as "pillars" around the base to give the illusion of height. |
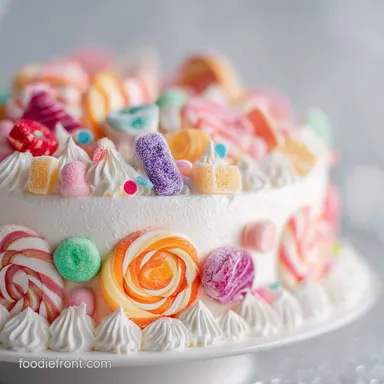
| Fruit Leather Strips | Surface Tension | These act like "wallpaper," providing a textured surface for other candies to grip. |
Handpicked Ingredients for a Structurally Sound Sugar Tower
- 3 Round Styrofoam or heavy cardboard tiers: (6, 8, and 10 inch) Why this? Provides the essential rigid skeleton that real cake lacks.
- 1 Cake board: (12 inch) Why this? The foundation that allows you to move the cake safely.
- 0.5 cup Honey: (Substitute: Corn syrup though it is much stickier and harder to clean.)
- 0.25 cup Powdered Sugar: (Substitute: Very finely ground granulated sugar if in a pinch.)
- 24 oz Dark chocolate batons: (Substitute: Kit Kat bars or any long, rectangular wafer chocolate.)
- 18 oz Natural fruit leather strips: (Substitute: Sour power belts or wide licorice ribbons.)
- 1 lb Organic gummy bears: (Substitute: Jelly beans or spice drops for a vintage look.)
- 10 oz Freeze dried strawberries: Why this? Adds a necessary crunch and acidic pop to balance the sugar.
- 20 Organic fruit lollipops: (Substitute: Cake pops or rock candy sticks.)
- 8 oz Roasted almonds: (Substitute: Macadamia nuts for a richer, fattier contrast.)
Essential Tools to Build Your Architecture of Sweetness
You don't need a whisk or a mixer for this one, but you do need a few "construction" tools. A small offset spatula is your best friend here. It allows you to smear that honey sugar glue exactly where you need it without getting your fingers entirely coated.
I also highly recommend having a pair of kitchen shears nearby. You'll need them to trim the fruit leather strips so they fit the circumference of your tiers perfectly.
Don't forget a clean, damp cloth. Building a cake of candy is messy business. Every time you touch the honey mixture, you'll want to wipe your hands before touching the "clean" candy, or you'll end up with honey fingerprints all over your dark chocolate batons.
A revolving cake stand isn't strictly necessary, but it makes the "wallpapering" process with the fruit leather about ten times faster.
Constructing Your Masterpiece step-by-step With Precision

- Prepare the mortar. Whisk the 0.5 cup honey and 0.25 cup powdered sugar in a small bowl until a thick, tacky paste forms. Note: This is your glue; it should be thick enough to hold a spoon upright.
- Anchor the base. Smear a tablespoon of the honey glue onto the center of the 12 inch cake board and press the 10 inch tier down firmly.
- Apply the wallpaper. Wrap the 18 oz fruit leather strips around the sides of all three tiers, using a thin layer of glue to secure them. Wait 2 minutes until the leather feels fused to the surface.
- Stack the tiers. Apply glue to the top center of the 10 inch tier, then center and press the 8 inch tier; repeat with the 6 inch tier on top.
- Build the chocolate walls. Apply a vertical line of glue to the back of the 24 oz dark chocolate batons and press them around the base of the bottom tier. Hold each for 5 seconds until it stands alone.
- Decorate the borders. Use the 1 lb organic gummy bears to fill any gaps between the chocolate batons and the fruit leather.
- Create the strawberry crown. Press the 10 oz freeze dried strawberries into the top tier using the honey glue, creating a vibrant red focal point.
- Insert the lollipops. Poke the 20 organic fruit lollipops into the top and middle tiers at varying heights until they feel secure and don't wobble.
- Fill the voids. Scatter the 8 oz roasted almonds and any remaining gummy bears onto the cake board base to hide the "skeleton."
- Final Set. Let the completed cake of candy sit at room temperature for 15 minutes until the honey mortar feels firm to the touch.
Navigating Sticky Situations and Common Construction Errors
Building this is much like the technique used in our Chocolate Ball Candy recipe, where temperature and "tack" are everything. If your room is too hot, the honey glue will become too fluid, and your candy will start to migrate toward the floor. I once tried to build one of these in a kitchen with the oven running at 450°F big mistake. The chocolate batons literally slid off like they were on a water slide.
Why Your Candy is Sliding
The most common issue is "over gluing." If you put too much honey mixture on a single piece of candy, the weight of the glue itself causes it to slide before it can set. Think of it like a postage stamp; you only need enough to cover the surface area.
If the candy is heavy, like a large lollipop, try "double gluing" apply glue to both the candy and the cake surface, let them sit for 30 seconds to get extra tacky, then press them together.
| Problem | Root Cause | Solution |
|---|---|---|
| Candy falling off | Too much honey glue used | Use a thinner, more even layer; hold for 10 seconds. |
| Chocolate "blooming" | Temperature fluctuations | Store in a cool, dry place; avoid the fridge. |
| Gummy bears sliding | Fruit leather is too oily | Wipe fruit leather with a paper towel before gluing. |
Common Mistakes Checklist
- ✓ Never use hot glue on Styrofoam; it will melt the base and release toxic fumes.
- ✓ Ensure the honey is room temperature; cold honey is too thick to spread evenly.
- ✓ Don't skip the fruit leather "wallpaper"; candy won't stick directly to Styrofoam easily.
- ✓ Avoid using "wet" candies like fresh fruit, as the moisture will dissolve your sugar glue.
- ✓ Let the glue set for at least 15 minutes before moving the cake to a different location.
Adapting the Tower Size for Any Crowd
When scaling this recipe down for a small gathering, you can easily use just the 8 inch tier. For a smaller version, I usually skip the chocolate batons and focus more on the fruit leather and gummy bears, similar to the whimsical vibes of a Simple Vanilla Mug recipe. Just remember that if you halve the ingredients, you still need to make a full batch of the "honey mortar" because a smaller amount is hard to mix effectively in a bowl.
If you're going big like a 5 tier wedding style cake of candy you'll want to increase the honey to 1.5 cups but only increase the powdered sugar to 0.5 cups. You want the glue to be slightly more fluid for large surface areas so you don't tear the fruit leather while spreading it.
For massive builds, I also recommend using wooden skewers to "pin" the heavier candies into the foam through the glue for extra security.
Decision Shortcut for Your Sweet Build
- If you want a sophisticated look, use only dark chocolate batons and freeze dried strawberries for a two tone aesthetic.
- If you want a kid friendly explosion, go heavy on the gummy bears and neon colored lollipops.
- If you want a crunchy texture, double the amount of roasted almonds and press them into every available gap.
Common Misconceptions About Sugar Structures
Many people think you need to refrigerate a cake of candy to keep it "firm." Actually, the refrigerator is the enemy of candy. The humidity in a fridge will make the gummy bears "sweat" and turn your crisp freeze dried strawberries into mushy sponges. Always keep this at room temperature in a dry spot.
Another myth is that you can use frosting as a glue. While frosting works for a real cake, it doesn't have the "grip" needed for heavy candies on a non porous surface like fruit leather or foam.
Frosting contains fats (butter or shortening) that act as a lubricant, which is the last thing you want when trying to fight gravity with a pound of gummy bears.
Keeping Your Sweet Creation Fresh for Future Snacking
Since this isn't a "real" cake, the storage rules are a bit different. You can actually make this entire cake of candy up to 48 hours in advance, as long as it's kept in a cool, dry place. If you have leftovers (rare, I know!), don't just throw them in a bag.
The honey mortar will make everything stick together into one giant lump. Instead, use a butter knife to pop the candies off the foam and store them in airtight containers by "type" chocolates in one, gummies in another.
- Countertop
- 3-5 days (covered loosely with plastic wrap to prevent dust).
- Fridge
- Not recommended (moisture ruins the texture).
- Freezer
- 2 months (only for the chocolate batons and gummy bears; remove from the foam first).
Zero Waste Tip: If you have broken chocolate batons or leftover roasted almonds, chop them up and use them as a topping for a Blueberry Bread Pudding recipe. The crunch of the almonds and the sweetness of the chocolate scraps are a perfect match for the creamy custard. You can even melt down the leftover "mortar" with a little bit of butter to create a quick honey toffee sauce for ice cream.
Refreshing Companions to Balance Out the Intense Sweetness
Because this cake of candy is let's be honest a total sugar bomb, you need something to reset the palate. I always serve this with a big pitcher of ice cold sparkling water infused with heavy amounts of lemon and lime.
The acidity and the bubbles help "scrub" the sugar off your tongue so you can actually taste the different flavors of the gummies and dark chocolate.
Comparison of Assembly Methods
| Feature | Fast (Honey Mortar) | Classic (Royal Icing) |
|---|---|---|
| Set Time | 15 minutes | 4-6 hours |
| Flavor | Sweet/Floral | Pure Sugar |
| Grip Strength | High (Tacky) | Medium (Brittle) |
If you want to go the extra mile, a platter of very tart Granny Smith apple slices or fresh grapefruit segments works wonders. The sharpness of the fruit provides a necessary break from the velvety chocolate and chewy gummies. It makes the whole experience feel like a curated tasting rather than just a sugar rush.
Trust me, your guests will thank you for the bit of "sour" to go with all that "sweet."

Recipe FAQs
Is it possible to create a cake entirely out of candy?
Yes, absolutely! A cake of candy is a visually stunning centerpiece constructed from various sweets, held together with an edible adhesive like a honey sugar mixture.
What is the best way to make candy stick together for a cake structure?
Use a honey sugar mortar. Whisking honey with powdered sugar creates a thick, tacky paste that acts as strong edible glue, similar to the adhesive principle in our Chocolate Ball Candy recipe.
Can I use frosting to assemble a cake of candy?
No, it's not ideal. Frosting lacks the necessary "grip" for heavy candies and contains fats that can act as lubricants, causing decorations to slide off.
How far in advance can I build a cake of candy?
Up to 48 hours ahead. Ensure it's kept at room temperature in a dry environment; refrigeration is not recommended as humidity can ruin the candy's texture.
What are the best ingredients for a stable candy cake structure?
Sturdy candies and a strong base. Dark chocolate batons provide vertical support, fruit leather strips offer surface tension, and using Styrofoam tiers with a cake board ensures structural integrity.
Is it true that some people use non-edible glue for candy cakes?
Yes, this is a misconception to avoid. Please never use hot glue or any non-edible adhesive on a candy cake, as it's unsafe and can release toxic fumes.
How do I balance the intense sweetness of a candy cake?
Serve with tart or refreshing accompaniments. Think sparkling water with lemon and lime, tart apple slices, or fresh grapefruit segments to cut through the sugar, much like the palate reset offered by our Vanilla Cream Soda: Silky Notes and Crackle.
Cake Of Candy
Ingredients:
Instructions:
Nutrition Facts:
| Calories | 756 kcal |
|---|---|
| Protein | 10.0 g |
| Fat | 28.1 g |
| Carbs | 118.2 g |
| Fiber | 7.7 g |
| Sugar | 77.9 g |
| Sodium | 22 mg |
