Banana Applesauce Cake: Moist and Oil-Free
- Time: Active 15 minutes, Passive 45 minutes, Total 1 hours
- Flavor/Texture Hook: Jammy sweetness with a tender, springy crumb
- Perfect for: Guilt free snacking or school lunchbox treats
- Mastering This Banana Applesauce Cake No Butter Recipe
- Why This Fruit Based Moisture Method Works
- Component Analysis of Key Ingredients
- Essential Elements and Possible Swaps
- Necessary Tools for Success
- Walkthrough of the Baking Process
- Strategies for Avoiding Kitchen Disasters
- Modifications for Different Batch Sizes
- Debunking Popular Fruit Baking Misconceptions
- Storage Guidelines and Waste Reduction
- Final Touches and Visual Appeal
- Recipe FAQs
- 📝 Recipe Card
Mastering This Banana Applesauce Cake No Butter Recipe
The aroma of cinnamon and caramelized fruit hitting the air as you pull this out of the oven is something I genuinely live for. I remember the first time I tried making a banana cake without butter, I was certain it would turn out like a literal brick.
Instead, I pulled out this golden, fragrant loaf that had that specific "squidge" we all crave in a good tea cake. It's the kind of bake that makes your kitchen smell like a high end bakery without the heavy cleanup of greasy bowls and beaters.
We've all been there where the bananas on the counter are looking a bit too "well loved," almost entirely black and smelling like pure sugar. That is exactly when you want to make this. Honestly, the uglier the banana, the better the cake.
This recipe is my absolute go to when I want something sweet but don't want to feel weighed down by heavy fats. It’s light, it’s impressive to look at, and it’s honestly one of the easiest desserts you'll ever throw together.
The real star here, though, is the unsweetened applesauce. I used to think applesauce was just for toddlers, but in the world of fat free baking, it is a total powerhouse. It provides the structural moisture that butter usually offers but brings a subtle tartness that balances out the deep sweetness of the overripe bananas.
You get a cake that isn't just "good for being healthy," but is actually just plain delicious. Right then, let’s get into why this specific combo works so well.
Why This Fruit Based Moisture Method Works
- Pectin Protection: Applesauce is loaded with pectin, which acts as a natural binder and moisture trap, preventing the flour from drying out during the 45 minutes of baking.
- Sugar Synergies: Using coconut sugar alongside overripe bananas creates a deep, almost molasses like flavor profile that mimics the richness of browned butter.
- Cellular Structure: The egg provides the necessary protein structure to hold up the fruit purees, ensuring the cake rises rather than turning into a dense pudding.
- Leavening Balance: The combination of baking soda and powder reacts with the slight acidity in the applesauce to create tiny air pockets for a lighter mouthfeel.
| Servings | Ingredient Adjustments | Pan Size | Cook Time |
|---|---|---|---|
| 6 people | Halve all ingredients (use 1 small egg) | 4x8 inch loaf pan | 35 minutes |
| 12 people | Use 340g banana, 125g applesauce, 1.5 cups flour | 9x5 inch loaf pan | 45 minutes |
| 24 people | Double ingredients (3 cups flour, 2 eggs) | Two 9x5 pans | 50 minutes |
When you're scaling this up, remember that the middle of a larger batch takes longer to set. If you're doubling the recipe to feed a crowd, I highly recommend using two separate pans rather than one giant one. This ensures the edges don't get dry before the center is fully baked.
It’s a simple trick that keeps the texture consistent across every slice.
Component Analysis of Key Ingredients
| Ingredient | Science Role | Pro Secret |
|---|---|---|
| Overripe Bananas | Primary humectant and sweetener | Use bananas with skins that are mostly black for the highest sugar content. |
| Unsweetened Applesauce | Fat replacement and acidity | Ensure it's "unsweetened" to avoid throwing off the delicate sugar balance of the batter. |
| All Purpose Flour | Structural framework | Weigh your flour (190g) instead of scooping to prevent a crumbly, dry texture. |
| Coconut Sugar | Caramelization and flavor | It has a lower melting point than white sugar, helping create a beautiful golden crust. |
Since we are skipping the butter, the quality of your bananas is non negotiable. If they aren't spotted, the cake will lack that signature "jammy" depth. If you're in a rush, you can pop yellow bananas in a 300°F (150°C) oven for 15 minutes until the skins turn black.
It's a lifesaver when the craving hits but your fruit isn't quite there yet.
For another treat that uses fruit to keep things moist, you might want to look at my banana muffins which follow a similar one bowl philosophy.
Essential Elements and Possible Swaps
To get that velvety finish, stick to these quantities. I’ve tested a few swaps over the years, and while some work, others can turn your cake into a swampy mess.
- 3 large overripe bananas (340g): These are the backbone. Why this? They provide natural sugars and a thick, creamy base for the batter.
- Substitute: 1.5 cups of pumpkin puree (note: less sweet, add 2 tbsp extra sugar).
- 0.5 cup unsweetened applesauce (125g): This replaces the fat. Why this? Its high water and pectin content keeps the crumb springy.
- Substitute: Mashed pears or plain non fat Greek yogurt (yogurt adds a slight tang).
- 1 large egg: The binder. Why this? It provides the protein "walls" that hold the air bubbles in place.
- Substitute: 1 flax egg (1 tbsp ground flax + 3 tbsp water), though the rise will be slightly less.
- 0.5 cup coconut sugar (100g): For depth. Why this? It offers a toasted, earthy sweetness that white sugar lacks.
- Substitute: Light brown sugar (will be slightly more moist and sweet).
- 1.5 cups all purpose flour (190g): The structure. Why this? It has the right protein level for a tender but sturdy cake.
- Substitute: White whole wheat flour for a nuttier, heartier texture.
- 1 tsp ground cinnamon & 0.25 tsp nutmeg: The aromatics. Why this? These warm spices accentuate the sweetness of the bananas.
- Substitute: Pumpkin pie spice blend for a more complex flavor.
Chef's Tip: If your applesauce is particularly watery, strain it through a fine mesh sieve for 5 minutes. You want the pulp, not a lake of juice, to ensure the cake doesn't end up gummy.
Necessary Tools for Success
You don't need a fancy stand mixer for this. In fact, a stand mixer is often the enemy of a good banana applesauce cake no butter because it's too easy to overwork the gluten. A simple large glass mixing bowl and a sturdy whisk are your best friends here.
I prefer using a 9x5 inch loaf pan because the high sides help the cake climb, but an 8 inch square tin works if you want "snacking cake" squares.
A silicone spatula is also essential. When you're folding the dry ingredients into the wet, you want a tool that can scrape the bottom of the bowl effectively without needing thirty rotations. The fewer times you stir, the more tender your cake will be. Finally,, a wire cooling rack is non negotiable.
If you let the cake cool inside the pan, the steam will get trapped and turn the bottom of your beautiful bake into a soggy mess.
Walkthrough of the Baking Process
- Preheat and Prep: Set your oven to 350°F (175°C). Lightly grease your 9x5 inch pan. Note: Using parchment paper with a slight overhang makes it easy to lift the cake out later.
- Fruit Liquification: Mash the 3 large bananas in your big bowl until they are mostly liquid with just a few small chunks.
- Wet Integration: Whisk in the 125g applesauce, 1 egg, 1 tsp vanilla, and 100g coconut sugar. Whisk until you see small bubbles forming on the surface.
- Dry Blend: In a separate small bowl, combine the 190g flour, 1 tsp baking soda, 0.5 tsp baking powder, 0.5 tsp salt, cinnamon, and nutmeg.
- The Gentle Fold: Gradually add the dry mix to the wet. Use your spatula to cut through the center and fold over just until the white flour streaks vanish.
- Transfer Batter: Pour the thick batter into your pan, smoothing the top with the back of a spoon.
- The Bake: Slide it into the center rack. Bake for 45 minutes until the top is a deep mahogany brown and a toothpick comes out clean.
- The Cooling Phase: Remove from the oven and let sit in the pan for 10 minutes.
- Final Set: Move the cake to a wire rack. Wait until it is completely cool to the touch before you even think about slicing it.
| Feature | Fresh Fruit Puree | store-bought Shortcut |
|---|---|---|
| Texture | Chunkier, more rustic | Smoother, more uniform |
| Flavor | Vibrant and tangy | Consistent but milder |
| Convenience | Requires mashing/prep | Pour and go |
For those times when you want something even faster, a vanilla mug cake is a great alternative, but nothing beats the slow baked flavor of this banana loaf.
Strategies for Avoiding Kitchen Disasters
The most common heartbreak with a fat free cake is the texture. Without butter to coat the flour particles, it's incredibly easy to develop too much gluten. If you stir this like you're trying to win a race, you’ll end up with a rubbery loaf that bounces when you drop it.
Treat the batter like it's a delicate cloud.
The Problem of the Gummy Bottom
If you find a dense, translucent layer at the bottom of your cake, it’s usually because of one of two things: either your bananas were too watery or you didn't let the cake cool properly. That "gummy" layer is actually undissolved starch and trapped steam.
Sunken Centers and Temperature Flops
A cake that looks beautiful in the oven but collapses as it cools usually suffered from a premature oven door opening. When you open the door to check on it, the temperature drops, and if the structure hasn't set yet, the air bubbles will pop. Wait at least 35 minutes before you even peek.
| Problem | Root Cause | Solution |
|---|---|---|
| Tough/Rubbery Texture | Overmixing the batter | Fold by hand until streaks just disappear. |
| Burned Top/Raw Middle | Oven temperature too high | Check oven with a thermometer; tent with foil at 30 mins. |
| Cake Won't Rise | Old baking soda/powder | Test leaveners in hot water/vinegar before starting. |
Common Mistakes Checklist
- ✓ Ensure bananas are soft and heavily spotted (underripe fruit lacks the sugar needed for structure).
- ✓ Don't skip sifting or whisking the dry ingredients (clumps of baking soda taste terrible).
- ✓ Avoid using cold eggs; room temperature eggs emulsify much better with fruit purees.
- ✓ Never slice the cake while it's hot (the steam is still working to set the internal crumb).
- ✓ Use a metal pan if possible; glass pans retain heat differently and can cause scorched edges.
Modifications for Different Batch Sizes
When you’re scaling this recipe down to a half batch, the biggest hurdle is the egg. Since the recipe calls for one large egg, you’ll want to crack it into a small bowl, whisk it lightly, and then measure out exactly 2 tablespoons.
Using a whole egg for half the flour will make the cake taste like an omelet. Also, remember to reduce your bake time by about 20% and use a smaller vessel, like a mini loaf pan.
If you are doubling the recipe for a big brunch, keep an eye on your spices. I’ve found that doubling salt and nutmeg can sometimes overwhelm the delicate banana flavor. Stick to 1.5x the amount of salt and spices for a double batch of batter. This keeps the flavor "impressive" without being "aggressive."
Debunking Popular Fruit Baking Misconceptions
One major myth is that "no butter" means "no flavor." People assume fat is the only carrier for flavor, but in this cake, the moisture from the applesauce actually allows the volatile compounds in the cinnamon and banana to shine much brighter.
Without the coating of fat on your tongue, you actually taste the fruit more clearly.
Another misconception is that you can just swap applesauce for butter in any recipe at a 1:1 ratio. While it works here, it’s because we’ve balanced the leavening agents specifically for the weight of the fruit. If you tried this with a shortbread cookie, you’d end up with a soggy pancake.
Recipes need to be designed from the ground up to handle the high water content of fruit purees.
Storage Guidelines and Waste Reduction
This cake is actually one of those rare bakes that tastes better on day two. As it sits, the moisture redistributes, and the banana flavor deepens. I recommend wrapping it tightly in plastic wrap once it's completely cool and leaving it on the counter.
- Fridge: Store in an airtight container for up to 5 days. It will firm up slightly when cold, so give it 10 minutes at room temperature before eating.
- Freezer: This cake freezes beautifully. Slice it first, then wrap individual pieces in foil. They’ll stay fresh for up to 3 months. You can pop a frozen slice directly into a toaster oven for a quick breakfast.
- Zero Waste: If you have leftover peels from your overripe bananas, don't toss them! You can soak them in water for 48 hours to make a nutrient rich "tea" for your houseplants. Also, if the cake does get a bit dry after a few days, it makes incredible "banana cake French toast" when dipped in a little milk and egg and fried up.
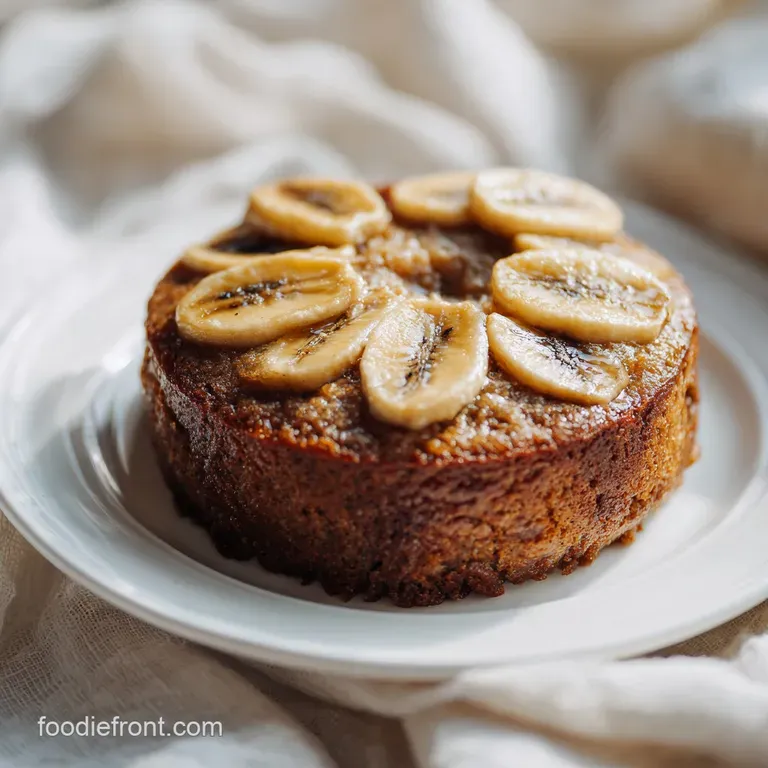
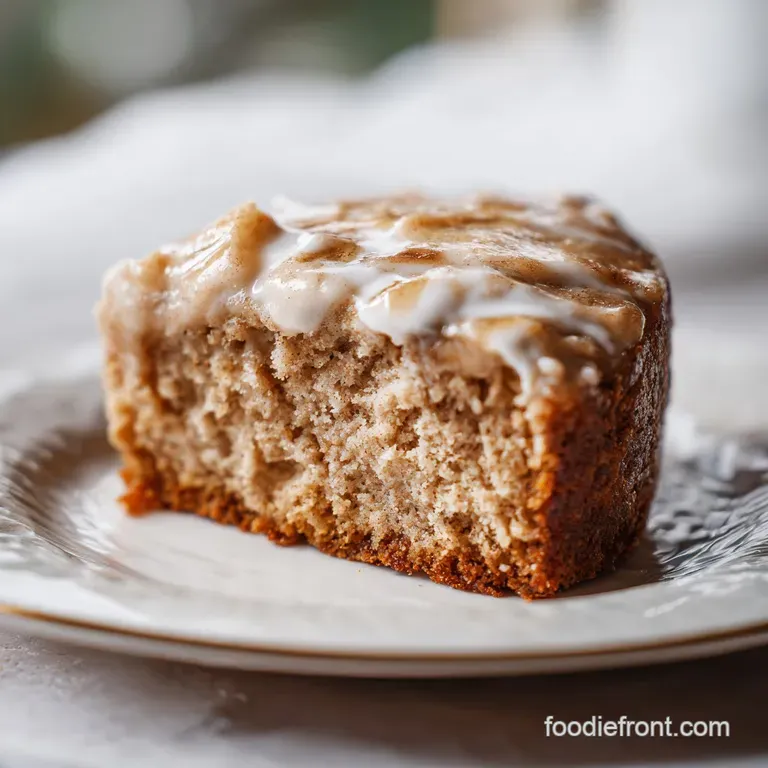
Final Touches and Visual Appeal
To make this cake truly impressive, you need to think about the garnish. Since the cake itself is a deep, warm brown, we want colors that pop. I like to focus on a "Color Balance" strategy to make it look as good as it tastes.
First, let's talk about the Gold Accent. Right before the cake goes into the oven, I like to slice a fourth banana lengthwise and lay the two long halves on top of the batter, cut side up.
As the cake bakes, these caramelize into a stunning golden yellow decoration that tells everyone exactly what's inside.
Second, the White Accent. A light dusting of powdered sugar (done only once the cake is bone cold) provides a sharp contrast against the dark crust. If you're feeling fancy, a dollop of thick Greek yogurt on the side adds a creamy white element that cuts through the sweetness.
Third, the Green Accent. A tiny sprig of fresh mint or even a few crushed pistachios scattered over the top adds a vibrant life to the plate. Add these right before serving so they don't wilt. The pop of green against the mahogany cake makes it look like it came straight from a professional kitchen.
Trust me, these small touches are what turn a "healthy snack" into a dessert your friends will actually ask for the recipe for. Enjoy every bite!

Recipe FAQs
Can you use applesauce instead of butter in a cake recipe?
Yes, it serves as a highly effective fat substitute. Applesauce provides the necessary moisture to create a tender crumb, though it results in a denser, cake like texture compared to butter based recipes.
Can you make a banana cake without butter?
Yes, the natural pectin in bananas helps maintain the structure of the cake. By using applesauce alongside overripe bananas, you replace the fat content while keeping the crumb moist and flavorful.
What is a good substitute for butter in banana cake?
Unsweetened applesauce is the best direct replacement for this recipe. If you enjoy this swap, you can apply the same moisture retention logic to our moist applesauce cookies to achieve a similar soft texture.
Can I use applesauce instead of butter in banana bread?
Yes, the substitution ratio is essentially one-to-one for this recipe. Because this cake relies on 0.5 cups of applesauce, it balances the leavening agents perfectly without needing traditional dairy fat.
How to ensure the cake doesn't turn out gummy?
Fold the dry ingredients into the wet mixture only until no white streaks remain. Overmixing develops excess gluten, which, combined with the moisture from the fruit purees, will lead to a heavy, gummy texture rather than a light crumb.
Is it necessary to use a metal pan for this recipe?
Yes, using a metal pan is recommended for even heat distribution. Glass pans retain heat differently and often cause the edges to scorch before the center has finished the 45-minute bake time.
How to store this cake for the best flavor?
Wrap the cooled cake tightly in plastic wrap to allow moisture to redistribute. Letting the cake rest until the next day allows the banana flavor to deepen, making it taste even better than it does fresh out of the oven.
Banana Applesauce Cake No Butter

Ingredients:
Instructions:
Nutrition Facts:
| Calories | 127 kcal |
|---|---|
| Protein | 2.5 g |
| Fat | 0.7 g |
| Carbs | 27.7 g |
| Fiber | 1.3 g |
| Sugar | 11.8 g |
| Sodium | 221 mg |
