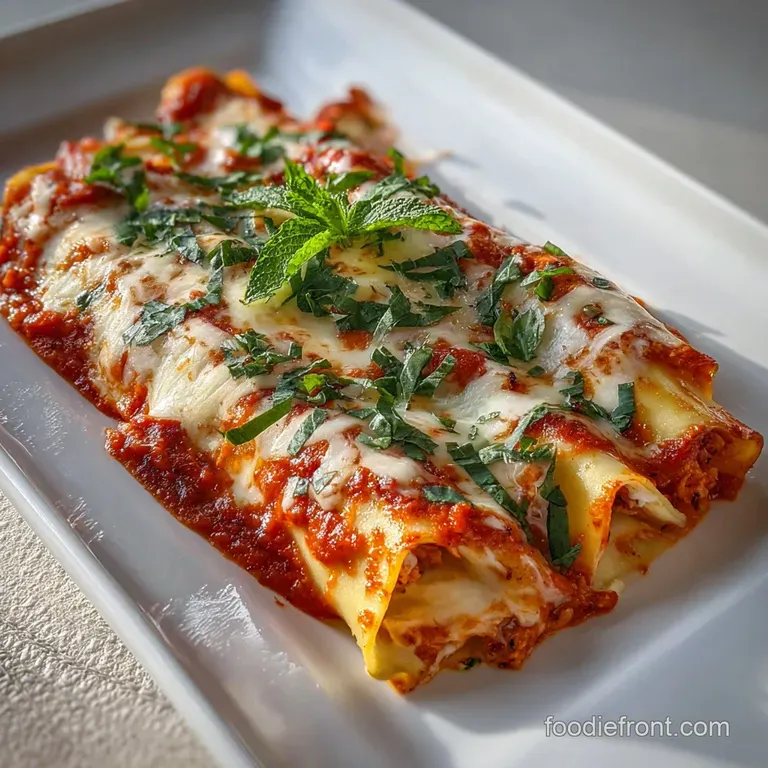
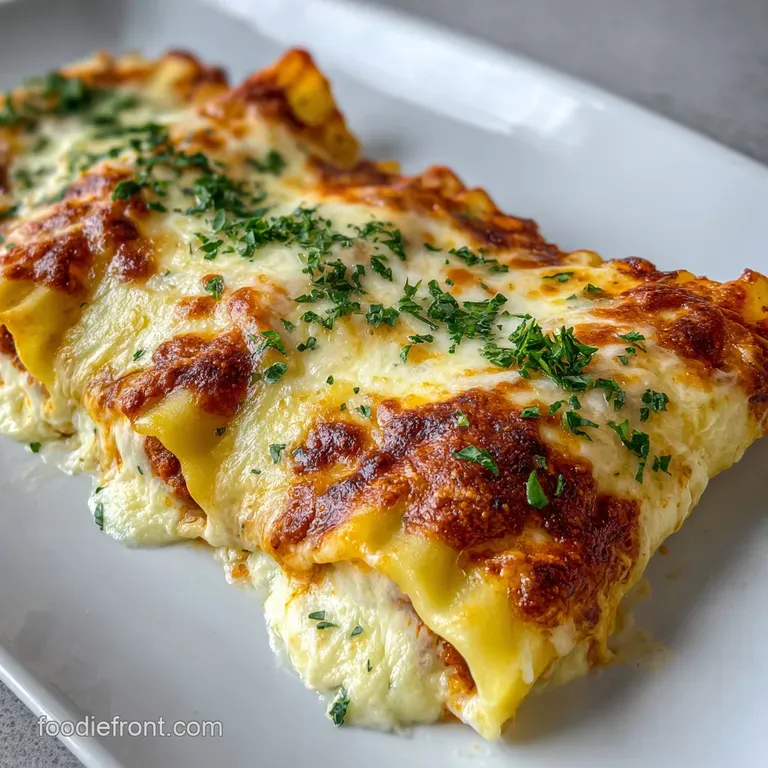
Meat Manicotti
- Time: Active 20 minutes, Passive 45 minutes, Total 1 hour 5 mins
- Flavor/Texture Hook: Velvety ricotta filling encased in tender pasta and topped with bubbly, golden mozzarella.
- Perfect for: Sunday family dinners or a meal prep win that tastes even better the next day.
- Master the Ultimate Meat Manicotti
- Essential Kitchen Metrics for Success
- Sourcing the Best Savory Elements
- Basic Tools for Easy Assembly
- Step-by-Step Guide to Success
- Solving Every Baking Problem Quickly
- Smart Swaps for Dietary Needs
- Guidelines for Storing Your Leftovers
- Perfect Sides for Your Meal
- Debunking Pasta Preparation Myths
- Recipe FAQs
- 📝 Recipe Card
Listen, I finally cracked the code on this one. You know how stuffing manicotti is usually a total nightmare where the shells shatter and you end up covered in cheese? I’ve spent way too many Sunday afternoons frustrated by broken pasta tubes, but I’ve learned a few tricks that make this the most satisfying, hearty meal in my rotation.
There is honestly nothing like the sizzle of ground beef hitting a hot pan mixed with the earthy aroma of dried oregano to make the whole house feel like a cozy bistro.
We’re making a real deal Meat Manicotti that doesn't skimp on the filling. I used to think you had to boil the pasta first, but trust me, that is the path to madness. This version uses the steam from the sauce and a splash of beef broth to cook the shells perfectly right in the pan.
It saves time, saves your sanity, and ensures the pasta doesn't turn into mush.
Get ready for a dish that is velvety, rich, and exactly what your family wants after a long week. We’re going to talk about the science of why this works, the exact tools that make stuffing a breeze, and how to get that perfect mahogany crust on your beef.
Let’s get into it because I know you’re going to love this one as much as my kids do.
Master the Ultimate Meat Manicotti
This recipe succeeds because we treat the pasta and the protein with specific techniques to ensure the texture is spot on. When you’re making manicotti with meat, the biggest hurdle is usually the structural integrity of the dish.
Nobody wants a puddle of sauce with some meat floating in it; we want defined, cheese filled tubes that stand up to a fork.
The Science of Why it Works
- Starch Gelatinization: By cooking the dry shells directly in the sauce with added beef broth, the pasta absorbs flavored liquid rather than plain water. This process allows the starch granules to swell and trap moisture, resulting in a firmer, more flavorful noodle.
- Protein Denaturation: The egg in the ricotta mixture acts as a binder. As it heats, the proteins unfold and then bond together, creating a stable matrix that keeps the cheese from leaking out of the shells during the bake.
- Maillard Reaction: Searing the ground beef until it's deeply browned creates complex flavor compounds. This chemical reaction between amino acids and reducing sugars provides that savory "umami" punch that defines a great meat sauce.
- Emulsification Stability: The fat from the whole milk ricotta and the beef creates a rich mouthfeel, but the egg helps emulsify these fats so the filling remains creamy rather than oily.
If you enjoy the process of browning meat to perfection, you might find the techniques here similar to what I use in my Beef Breakfast Sausage recipe where getting that mahogany crust is everything.
Essential Kitchen Metrics for Success
To get this right every single time, I’ve found that consistency is key. We aren't just guessing here; we're using specific weights and times to ensure the beef is juicy and the pasta is tender.
This isn't experimental cooking it's reliable, family style comfort that works because we respect the ingredients.
| Component | Target Metric | Why It Matters |
|---|---|---|
| Ground Beef | 85% Lean / 15% Fat | Provides enough fat for flavor without making the dish greasy. |
| Baking Temperature | 375°F (190°C) | High enough to bubble the sauce and melt cheese without drying the pasta. |
| Internal Temp | 160°F (71°C) | Ensures the egg in the ricotta filling is safely cooked and set. |
Using the right beef makes a massive difference in the final texture of your manicotti with meat recipe. If you go too lean, the filling feels chalky. If you go too fatty, the sauce becomes an oil slick. I stick to 85% lean for that perfect balance of moisture and structure.
Sourcing the Best Savory Elements
When you're shopping for easy meat manicotti, quality matters more than quantity. Since we only have a handful of ingredients, each one needs to pull its weight. I always reach for whole milk ricotta honestly, don't even bother with the low-fat version; it’s watery and lacks that velvety finish we’re after.
- 1 lb ground beef (85% lean): Why this? Provides the essential savory base and structural "bite" to the filling.
- 15 oz whole milk ricotta cheese: Why this? The high fat content ensures a creamy, non grainy texture after baking.
- 8 oz manicotti shells (approx. 14 shells): Why this? These large tubes are designed to hold the heavy meat and cheese mixture.
- 2 cloves garlic, grated: Why this? Grating releases more oils than chopping, distributing flavor more evenly through the meat.
- 1/2 cup beef broth: Why this? This provides the extra hydration needed to cook the dry pasta in the oven.
| Original Ingredient | Substitute | Why It Works |
|---|---|---|
| Ground Beef | Ground Turkey (9% fat) | Leaner profile but stays moist if you don't overcook the initial sear. |
| Beef Broth | Dry Red Wine | Adds acidity and depth, though the pasta may take 5 mins longer to soften. |
| Ricotta | Small Curd Cottage Cheese | Similar moisture levels but results in a chunkier, more rustic filling. |
Adding that half cup of beef broth is my "secret weapon." It ensures the manicotti with ricotta and meat doesn't end up with those crunchy, uncooked edges that ruin an otherwise great meal. It creates a steam oven effect right under the foil.
Basic Tools for Easy Assembly
You don't need a kitchen full of gadgets for this, but two things will change your life: a large zipper top bag and a good baking dish. I used to use a spoon to stuff these, and it was a mess. Now, I just snip the corner off a gallon bag and pipe the filling in. It’s faster, cleaner, and much more satisfying.
You’ll want a 9x13 inch ceramic or glass baking dish. These materials hold heat evenly, which is crucial for making sure the shells in the corners cook at the same rate as the ones in the middle.
A heavy skillet is also a must for browning the beef I love using a cast iron or a heavy bottomed stainless steel pan to get that beautiful sizzle.
If you’re someone who loves a good "set it and forget it" tool, you might also appreciate the precision of a Sous Vide Short Ribs recipe for other beef heavy nights. But for today, we’re sticking to the oven.
step-by-step Guide to Success
Right then, let's get cooking. The goal is to move efficiently so we can get this in the oven and relax while it bakes. Remember to keep your beef broth handy it's the key to the whole "no boil" magic.
- Brown the beef. Sauté 1 lb ground beef and 1/2 cup minced onion in a skillet over medium high heat until no pink remains and the meat is mahogany.
- Aromatize the base. Stir in 2 grated garlic cloves, 1 tsp oregano, 1/2 tsp salt, and 1/4 tsp pepper, cooking for 1 minute until the garlic smells fragrant but isn't brown.
- Cool the meat. Remove the beef from the heat and let it cool for about 10 minutes. Note: Adding hot meat to cold cheese will cause the ricotta to break and become oily.
- Mix the filling. In a large bowl, combine the cooled beef, 15 oz ricotta, 1 cup mozzarella, 1/2 cup parmesan, the beaten egg, and 2 tbsp fresh parsley until completely uniform.
- Prep the pan. Spread about 1 cup of the marinara sauce on the bottom of a 9x13 baking dish.
- Stuff the shells. Transfer the meat and cheese mixture to a large plastic bag, snip the corner, and pipe the filling into the dry manicotti shells until they are full.
- Arrange and douse. Place the stuffed shells in the dish, then pour the remaining sauce, 1/2 cup beef broth, and the remaining cup of mozzarella over the top until the shells are mostly submerged.
- Seal and bake. Cover tightly with foil and bake at 375°F for 40 minutes, then uncover and bake 5 more minutes until the cheese is bubbly and golden.
Chef's Tip: For the best flavor distribution, grate your garlic directly into the pan using a microplane. The fine paste melts into the beef fat, ensuring every single bite has that punchy garlic hit without any bitter chunks.
Solving Every Baking Problem Quickly
Even with the best plan, things can go sideways. Maybe your oven runs hot, or maybe your sauce was a bit thicker than mine. Don't panic! Most meat and cheese manicotti issues are easily fixed with a little extra moisture or a quick change in temperature.
Crunchy Pasta Edges
This usually happens if the foil wasn't sealed tightly enough, allowing the steam to escape. If you check the pasta and it's still hard after 35 minutes, add 2 tablespoons of water to the corners of the dish and reseal the foil immediately.
Filling Leaking Out
If your filling is running out into the sauce, the egg might have been too small or the ricotta was too watery. Next time, try straining your ricotta through a cheesecloth for 30 minutes before mixing.
For now, just let the dish rest for 15 minutes after baking; as it cools, the proteins will firm up.
| Problem | Root Cause | Solution |
|---|---|---|
| Watery Sauce | Too much broth or frozen spinach used | Bake uncovered for an extra 10 minutes to evaporate moisture. |
| Burnt Cheese Top | Rack was too high in the oven | Move to the middle rack and tent with foil for the first 30 minutes. |
| Bland Filling | Under seasoned beef base | Add a pinch of red pepper flakes or extra parmesan before serving. |
If you ever find yourself struggling with meat textures in other dishes, like a stir fry, I’ve got a great Simple Beef Stir recipe that breaks down the "velveting" technique to keep beef tender.
Smart Swaps for Dietary Needs
I know we all have that one friend who's going gluten-free or the family member who wants more greens. This recipe is surprisingly flexible. You can easily turn this into a spinach meat manicotti by squeezing all the moisture out of a 10 oz package of frozen spinach and folding it into the cheese mixture.
For a gluten-free version, look for GF manicotti shells (usually made from rice or corn flour). Keep in mind that GF pasta often needs more moisture, so increase the beef broth to 3/4 cup to ensure they don't stay gritty. If you can't find GF shells, you can even use gluten-free crepes to wrap the filling!
- If you want a crispy top, broil the dish for the final 3 minutes of cooking.
- If you want a lighter filling, swap half the ground beef for finely chopped sautéed mushrooms.
- If you want deep richness, add a tablespoon of tomato paste to the beef while it browns.
Guidelines for Storing Your Leftovers
One of the reasons I love authentic italian meat manicotti is that it actually tastes better the next day. The pasta has more time to absorb the sauce, and the flavors of the oregano and garlic really meld together. It's the ultimate leftovers win.
Storage: Keep leftovers in an airtight container in the fridge for up to 4 days. When reheating, add a tiny splash of water or extra sauce to the container to keep the pasta from drying out in the microwave.
Freezing: This is a fantastic freezer meal. You can freeze the entire dish (unbaked) for up to 3 months. Just bake it from frozen at 350°F, adding about 20-30 minutes to the total time.
Zero Waste Tip: If you have leftover meat filling that won't fit in the shells, don't throw it out! Roll it into small meatballs and drop them into the sauce around the shells, or save it to top a piece of toasted sourdough for a quick lunch the next day.
Perfect Sides for Your Meal
When you're serving something as hearty as manicotti with meat, you want sides that provide a bit of contrast. A heavy pasta dish loves something acidic or crunchy to cut through all that rich cheese and beef.
A classic arugula salad with a sharp lemon vinaigrette is my go to. The peppery bite of the greens and the acid from the lemon reset your palate between bites of the velvety manicotti.
If you're feeling extra indulgent, a loaf of garlic bread is never a bad idea use it to swipe up every last bit of that mahogany meat sauce.
If you’re looking for something a bit more substantial to serve alongside for a big dinner party, a tray of roasted balsamic Brussels sprouts adds a nice charred sweetness that complements the savory beef perfectly.
Debunking Pasta Preparation Myths
One major myth is that you must boil manicotti shells before stuffing them. This is simply not true. As long as you provide enough liquid (like our beef broth and marinara) and seal the pan tightly with foil, the pasta will cook perfectly through steam.
In fact, no boil shells often have a better "al dente" texture because they aren't being cooked twice.
Another common misconception is that you should rinse your pasta. Never rinse! The starch on the outside of the shells helps the sauce cling to the pasta. If you rinse it off, the sauce will just slide right off into a pool at the bottom of the dish.
Finally, some people think you need a fancy piping bag for the filling. A simple gallon sized freezer bag with the corner cut off is actually better because it's stronger and can handle the bulk of the ground beef without popping. It's a practical, no fuss solution for a busy home cook.
I hope this helps you master your next Italian night! This Meat Manicotti is a true labor of love that doesn't actually require that much labor once you know the tricks. Enjoy every bite!

Recipe FAQs
What are manicotti with meat called?
They are commonly referred to as Meat Manicotti. This name directly reflects the primary ingredients and the classic Italian pasta shape used.
What meat goes well with manicotti?
Ground beef is the most traditional and popular choice. Its savory flavor and texture blend well with ricotta cheese and marinara sauce, creating a rich filling.
What are common manicotti mistakes?
Overcooking the pasta before stuffing is a common mistake. This leads to mushy shells that fall apart, making them difficult to handle and serve.
What is the trick to filling manicotti?
Use a piping bag or a large zipper bag with a corner snipped off. This method provides better control and allows you to fill the shells evenly without making a mess or breaking them, much like mastering controlled piping in baking.
Do you need to boil manicotti shells before stuffing?
No, you do not need to boil manicotti shells beforehand. When baked in sauce with added liquid, dry shells absorb moisture and cook through, retaining their shape better.
What meat texture works best for manicotti filling?
A medium fat ground meat, like 85% lean beef, offers the best balance. This ensures the filling is flavorful and moist without being greasy, creating a satisfying bite.
Can I substitute the ground beef in manicotti?
Yes, you can substitute ground turkey or Italian sausage. Ground turkey offers a leaner option, while sausage adds its own blend of spices for a different flavor profile, similar to how flavor is built in a Quick Ground Beef Tacos Recipe: Mahogany Glaze.
Meat Manicotti

Ingredients:
Instructions:
Nutrition Facts:
| Calories | 612 kcal |
|---|---|
| Protein | 38.3 g |
| Fat | 27.2 g |
| Carbs | 42.1 g |
| Fiber | 3.2 g |
| Sugar | 6.4 g |
| Sodium | 1145 mg |
