Easy Iced Coffee at Home

- Effort/Time: 10 minutes total
- Flavor Hook: Bright, clean, and energizing
- Perfect for: Busy-mornings and mid-day resets
- Master the Ultimate easy iced coffee at home
- Thermal Shock and Extraction: Why This Recipe Works
- Precision Variables: Yield, Time, and Yield Specs
- Molecular Components: The Chemistry of Your Ingredients
- Essential Tools for a Minimalist Coffee Setup
- The 10 Minute Assembly Protocol for Quick Sips
- Fixing Diluted Brews and Bitter Extraction Profiles
- Creative Customization and Flavor Profile Variations
- ⚗️ The Scaling Lab: The Physics of Quantity
- Common Myths
- Longevity and Maintaining Peak Aromatic Freshness
- Texture Pairings and Serving Your Refreshing Drink
- Recipe FAQs
- 📝 Recipe Card
Master the Ultimate easy iced coffee at home
There is nothing more soul crushing than paying seven dollars for a plastic cup of brown water that tastes more like melted freezer frost than actual espresso. We’ve all been there the ice melts within three minutes, the acidity becomes a sharp, metallic bite, and you’re left with a lukewarm, diluted mess that costs more than a decent bag of beans.
It is a texture failure and a financial drain that usually ends with the drink sitting half finished in a cup holder.
I spent years trying to replicate that velvety, punchy shop flavor by simply sticking leftover hot coffee in the fridge, only to end up with a bitter, "old" tasting liquid. I realized that the physics of cooling coffee is the enemy; as coffee sits and cools slowly, the oils oxidize and the chlorogenic acids break down into quinic acid, which is the source of that harsh, burnt toast aftertaste.
I ruined dozens of cups by rushing the process with too much ice before I understood the thermal mass required to chill coffee without drowning the flavor. This is why learning how to make easy iced coffee at home is a game changer.
The secret to this easy iced coffee at home isn't some expensive gadget; it’s the science of flash chilling. By brewing a high concentration extract directly over a specific weight of ice, we trigger an immediate thermal shock that traps the volatile aromatic compounds.
This prevents oxidation and creates a shimmering, mahogany colored base that stays crisp. When you hit it with that splash of whole milk and vanilla, the fats emulsify with the coffee oils to create a smooth, refreshing sip that actually tastes like coffee, not watered down disappointment.
Mastering this process ensures your easy iced coffee at home rivals any professional preparation.
Thermal Shock and Extraction: Why This Recipe Works
- Aromatic Volatility: Flash chilling traps aromatic esters within the liquid before they can escape as steam, preserving the "fresh ground" scent.
- Concentrated Solubility: Brewing with a 1:8 ratio (coffee to water) ensures the beverage maintains its structural integrity even as the ice begins to undergo phase change.
- Lipid Emulsification: The addition of milk fats helps to coat the tongue, buffering the coffee’s natural acidity and creating a velvety mouthfeel.
- Thermal Mass Equilibrium: Using large ice cubes provides a slower surface area-to-volume melt rate, preventing rapid dilution while still dropping the temperature of the 200°F liquid to 40°F in seconds.
Precision Variables: Yield, Time, and Yield Specs
| Metric | Value | Technical Note |
|---|---|---|
| Total Yield | 1 serving | Approximately 12 oz total volume after ice melt |
| Prep Time | 5 minutes | Includes grinding and water heating |
| Cook/Brew Time | 5 minutes | Precision extraction window |
| Extraction Temp | 200°F (93°C) | The "Goldilocks" zone for flavor without bitterness |
| Total Time | 10 minutes | From beans to first sip |
Molecular Components: The Chemistry of Your Ingredients
| Ingredient | Chemical/Physical Role (Science) | The Pro Secret (Why This Matters) |
|---|---|---|
| 3 tbsp (22g) Ground Coffee | Maillard reacted cellulose provides solids | Use a medium dark roast like Peet's Major Dickason's for bold body. |
| 6 oz (177ml) Water | Universal solvent for caffeine and lipids | Filtered water prevents chlorine from muting the coffee's bright acidity. |
| 1 cup (140g) Ice Cubes | Heat sink for rapid thermal reduction | Larger cubes (like those from a Lodge Silicone Tray) melt slower than chips. |
| 2 tbsp (30ml) Whole Milk | Fat-based emulsion and pH buffering | High fat content creates a silky texture that balances the coffee's tannins. |
Essential Tools for a Minimalist Coffee Setup
To get this right, you don't need a $1,000 espresso machine, but you do need precision. A Hario V60 or a simple pour over cone allows for the best control over the brew.
I personally use an Oxo Gooseneck Kettle because the narrow spout lets you control the flow rate of the 200°F water, ensuring you saturate every single grain of that 22g of coffee.
If you don't have a scale, use a standard measuring spoon, but remember that weight is king for consistency when making easy iced coffee at home.
For the vessel, grab a sturdy 16 oz glass I love a Libbey Can Glass for the aesthetics, but any thick walled glass will handle the thermal shock of hot liquid hitting ice. Avoid thin wine glasses, which might crack.
You’ll also want a long handled spoon to reach the bottom and create the necessary vortex for temperature equilibrium.
The 10 Minute Assembly Protocol for Quick Sips
- Grind 22g of coffee beans.Note: Aim for a "kosher salt" texture to ensure optimal surface area for the 5 minute brew.
- Heat 177ml of filtered water to 200°F. Note: If you don't have a thermometer, let boiling water sit for 30 seconds until the rolling bubbles subside.
- Place ground coffee into a filter.Note: Use a rinsed paper filter to remove "papery" flavors before brewing starts.
- Pour 40ml of water over grounds for 30 seconds.Note: Watch for the "bloom" where the coffee bubbles; this releases trapped CO2 that blocks extraction.
- Slowly pour the remaining 137ml of water.Note: Pour in concentric circles until the coffee bed is fully saturated and the liquid looks mahogany.
- Add 15ml simple syrup to the hot extract.Note: Sugar dissolves instantly in hot liquid, preventing "gritty" sips at the bottom of the glass.
- Stir in 2.5ml vanilla extract.Note: The heat carries the vanilla aroma throughout the brew for better sensory integration.
- Fill your glass with 140g of large ice cubes.Note: Pack the glass to the brim to ensure the liquid hits as much surface area as possible.
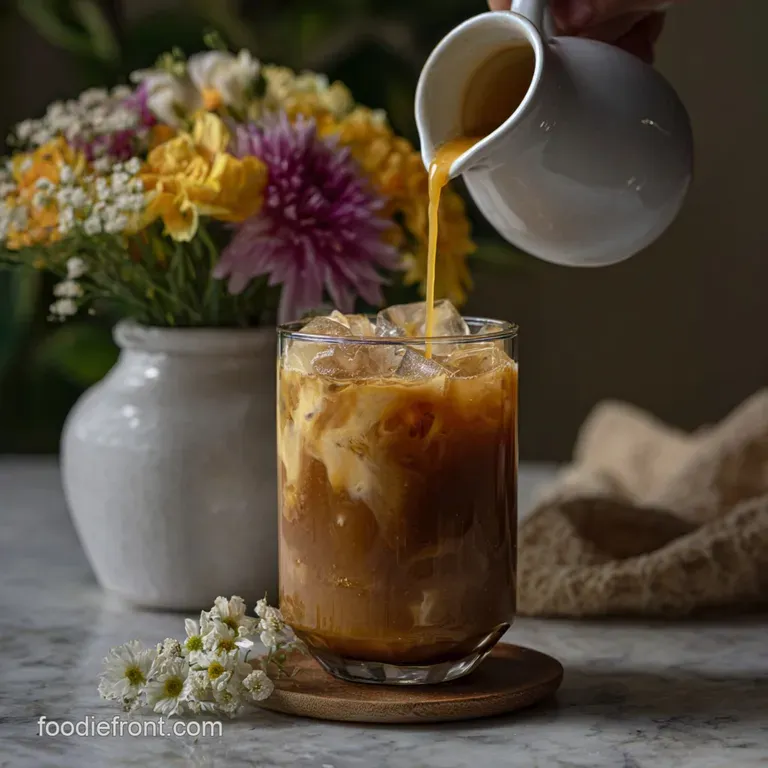
- Pour the hot coffee mixture directly over the ice.Note: Watch for the immediate shimmer as the liquid chills and the ice "cracks" slightly.
- Add 30ml of whole milk and stir vigorously.Note: Stir for 10 seconds until the glass feels frosty and the color is a uniform creamy tan.
Fixing Diluted Brews and Bitter Extraction Profiles
Why Your Coffee Tastes Watery
If your coffee at home feels thin, the most likely culprit is the ice-to-coffee ratio or the grind size. When the coffee is ground too coarsely, the water rushes through without pulling out the soluble solids (oils and caffeine). This results in a weak, sour liquid that can't stand up to the addition of milk. Think of it like the technique used in our Homemade Brownies From Scratch recipe; if the ratios are off, the structure collapses. Achieving the right structure is key to a successful easy iced coffee at home.
| Problem | Root Cause | The Fix | Pro Protocol |
|---|---|---|---|
| Weak/Watery | Grind too coarse | Fine tune grind to "table salt" | Use 10% more coffee grounds next time. |
| Bitter/Burnt | Water too hot (>205°F) | Use 200°F water exactly | Let boiled water sit longer before pouring. |
| Gritty Bottom | Sugar didn't dissolve | Add syrup to hot coffee first | Use a whisk or long spoon to ensure full integration. |
Creative Customization and Flavor Profile Variations
If you want a deeper, more indulgent drink, you can swap the simple syrup for a tablespoon of chocolate sauce. This creates a hack for an iced mocha that rivals any cafe. The fats in the chocolate sauce will bind with the iced coffee at home base, creating a thicker, almost fudge like consistency. It's a great way to energize your afternoon. For a similar quick treat, you might also enjoy making a batch of No Bake Chocolate Cookies recipe to snack on while you sip.
- The Vietnamese Style: Replace simple syrup and milk with 2 tbsp of sweetened condensed milk. Stir into the hot coffee before pouring over ice for a thick, caramel like finish.
- The sugar-free Option: Swap the simple syrup for a monk fruit liquid sweetener. Since monk fruit is 100 250x sweeter than sugar, use only 2 3 drops to avoid a chemical aftertaste.
- dairy-free Swap: Use Oatly Full Fat Oat Milk. It has a similar lipid profile to whole milk, which is essential for that velvety texture we want in easy iced coffee at home.
⚗️ The Scaling Lab: The Physics of Quantity
When you are doubling this recipe for a friend, the thermodynamics change significantly. You cannot simply double the ice and expect the same results. This scaling adjustment is vital for consistent easy iced coffee at home results for multiple people.
- Thermal Mass Accumulation: 12 oz of hot coffee has much more thermal energy than 6 oz. It will melt your ice 40% faster. To combat this, increase your ice by 1.5x, not 2x, and use a larger, chilled vessel.
- Flavor Saturation: Coffee compounds accumulate non-linearly. When brewing for two, use 1.75x the coffee grounds (approx 38g) to keep the flavor from becoming overly aggressive or "muddy."
- The Cooling Curve: In a larger batch, the center of the liquid stays hot longer while the edges chill. You must stir for at least 30 seconds (triple the single serve time) to reach temperature equilibrium throughout the glass.
Common Myths
- Myth: You should use "leftover" morning coffee for iced coffee.
Truth: Hot coffee starts to oxidize within 20 minutes. By the time it’s cold, the lipids have turned rancid, creating a sour, stale flavor profile. Fresh extraction is non-negotiable for making quality easy iced coffee at home.
Myth: Cold brew is just "iced coffee" made differently.
- Truth: Cold brew uses time (12 24 hours) and cold water, which misses the extraction of certain bright acids that only 200°F water can pull. Flash chilled iced coffee at home is brighter and more complex.
Longevity and Maintaining Peak Aromatic Freshness
You can store the concentrated coffee base (the coffee mixed with syrup and vanilla) in an airtight Mason Jar in the fridge for up to 48 hours. However, do not add the milk or ice until you are ready to drink.
The milk will begin to separate, and the ice will obviously melt, ruining the concentration.
💡 ZERO WASTE: Don't discard leftover brewed coffee if you made too much. Transform: Pour it into an ice cube tray and freeze. Science: Using coffee ice cubes in your next drink prevents dilution entirely because as the "ice" melts, it only adds more coffee flavor to the glass.
Texture Pairings and Serving Your Refreshing Drink
This drink is all about the contrast between the sharp, cold coffee and the creamy, sweet finish. To serve it like a pro, pour the milk slowly over the back of a spoon so it "marbles" through the dark coffee this looks incredible and allows for a varied flavor experience with every sip.
If you’re hosting a brunch, this energizing drink pairs beautifully with something bright and crunchy. It actually cuts through the richness of a savory side, making it a surprising but excellent companion to a Homemade Coleslaw Recipe if you're serving a heavy pulled pork lunch. The acidity in the coffee and the slaw work together to cleanse the palate. Keep your sips frequent and enjoy the hack of a cafe quality morning without the cafe quality price tag. This easy iced coffee at home is the only method you'll ever need.

Recipe FAQs
What is the best temperature for the brewing water?
200°F (93°C). This is the "Goldilocks" zone for optimal extraction of desirable solids. Water hotter than this strips bitter compounds, while water too cool leaves coffee sour and underdeveloped.
Is it necessary to use a gooseneck kettle?
No. Pour over control is key. The narrow spout allows precise saturation of grounds to prevent channeling, which is the rapid, uneven flow of water through the coffee bed.
Why does my iced coffee taste dull or stale quickly?
Slow cooling oxidizes volatile aromatic compounds. As heat dissipates slowly, oils break down into quinic acid, producing harsh off-flavors.
- Brew concentrate directly over ice
- Use high-quality filtered water
- Avoid storing leftover coffee for over 24 hours
Is grinding finer better for iced coffee extraction?
Myth: A finer grind extracts more flavor overall. Reality: A grind that is too fine for a fast pour over creates excessive resistance, leading to over extraction and bitter flavors. A medium coarse grind is ideal.
Should I use simple syrup or granulated sugar?
Simple syrup dissolves instantly for smoothness. Granulated sugar requires vigorous stirring in cold liquid, leading to sediment at the bottom of the glass. Syrups ensure even sweetness integration.
Can I use dairy-free milk instead of whole milk?
Oat milk mimics whole milk fats best. While almond or soy milk can work, their lower fat content reduces the desirable mouthfeel and buffering effect against coffee acidity. Oat milk provides necessary lipids.
How long can I store the concentrated coffee base?
Up to 48 hours in an airtight container. Refrigeration slows chemical reactions, but adding milk or ice before storage degrades texture rapidly. Always add dairy just before serving.
Easy Iced Coffee At Home

Ingredients:
Instructions:
Nutrition Facts:
| Calories | 75 calories |
|---|---|
| Protein | 1.1g |
| Fat | 1.1g |
| Carbs | 14.8g |
| Fiber | 0g |
| Sugar | 14.2g |
| Sodium | 18mg |
