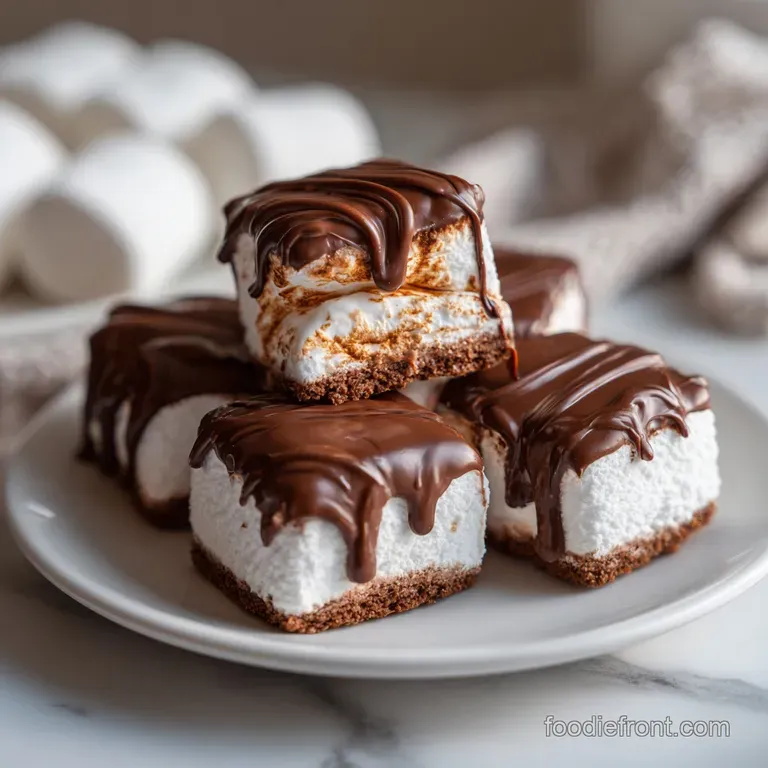
Chocolate Covered Marshmallows: Velvety Melt
- Time: Active 10 minutes, Passive 5 mins, Total 15 minutes
- Flavor/Texture Hook: A glass like chocolate shatter followed by a velvety marshmallow melt
- Perfect for: Holiday gift baskets, last minute party platters, or a quick sweet tooth fix
- Mastering the Snap in Chocolate Covered Marshmallows
- The Key Numbers for Success
- Component Analysis: Breaking Down the Elements
- Essential Tools for a Clean Finish
- A Practical Guide to Flawless Dipping
- Avoiding Common Dipping Disasters
- Exciting Variations for Every Palate
- Storing Your Treats for Maximum Crunch
- Elevating Your Display for Any Occasion
- Kitchen Myths Debunked
- Recipe FAQs
- 📝 Recipe Card
Mastering the Snap in Chocolate Covered Marshmallows
We’ve all been there, standing in the kitchen with a bag of marshmallows and a bar of chocolate, thinking it’s the easiest thing in the world. But then the chocolate seizes, or it’s too thick and pulls the marshmallow right off the stick.
I remember my first attempt at homemade chocolate covered marshmallows; it looked like a toddler had a chocolate explosion in the pantry. It was a sticky, lumpy mess that tasted okay but looked horrific.
That’s when I realized that the magic isn't just in the dipping it's in the temperature and the "slip" of the chocolate. You want a coating that is thin enough to drape elegantly but stable enough to hold that gorgeous edible gold dust.
Now, when I bring these to a party, people actually ask me which local chocolatier I bought them from. It’s our little secret that they take about 15 minutes of actual work.
Trust me, once you hear that first crack of the dark chocolate shell against the soft marshmallow, you'll never go back to store-bought. We're looking for a finish that is glossy, sophisticated, and has just enough bitterness from the dark chocolate to balance the sugar bomb of the marshmallow.
Let’s get into how we actually make that happen without losing our minds.
The Science of the Snap: Adding refined coconut oil to the chocolate creates a "magic shell" effect by lowering the melting point while helping the fats crystallize quickly. This ensures a brittle, clean break when you bite in rather than a soft, fudgy chew.
| Method | Time | Texture | Best For |
|---|---|---|---|
| Stovetop (Double Boiler) | 8 mins | Ultra glossy and consistent | Large batches and beginners |
| Microwave | 3 mins | Matte but quick | Small cravings or quick snacks |
| Oven (Low Temp) | 12 mins | Thick and heavy | Not recommended for this recipe |
Choosing the right method depends on how much patience you have today. If you want that professional, mirror like finish, the stovetop double boiler is your best friend because it prevents the chocolate from scorching.
However, if you're making quick chocolate covered marshmallows for a movie night, the microwave works just fine as long as you go in 20 second bursts.
The Key Numbers for Success
Before we start melting anything, we need to look at the logistics. Precision is what separates a sticky marshmallow from a polished dessert. We are working with 8 oz of high-quality dark chocolate, which is exactly enough to coat 16 large Jet Puffed marshmallows with a little bit of wiggle room for dipping.
Chef's Tip: Freeze your marshmallows for exactly 10 minutes before you start. This firms up the gelatin structure so they don't melt or deform when they hit the warm chocolate.
Stabilizing the Coating
To get that professional finish, the chocolate needs to be fluid. If it's too thick, you'll end up with a "foot" of chocolate at the bottom of your marshmallow. We use refined coconut oil to thin it out without losing the ability to harden.
Preventing Moisture Migration
Marshmallows are basically sugar sponges. If your kitchen is humid, they will start to "sweat" under the chocolate. Work in a cool, dry area and ensure your bamboo skewers are completely dry before inserting them.
Component Analysis: Breaking Down the Elements
| Ingredient | Science Role | Pro Secret |
|---|---|---|
| Dark Chocolate (60% Cacao) | Provides structural shell and bitterness | Use chips or finely chopped bars for even melting |
| Refined Coconut Oil | Thins the chocolate and adds shine | Ensure it is "refined" so it doesn't taste like a tropical island |
| Jet Puffed Marshmallows | Acts as the stable, airy base | Use fresh bags; stale marshmallows won't grip the skewer |
Selecting the Best Components for Dipping
For this chocolate covered marshmallows recipe, the quality of your chocolate is everything. Since there are so few ingredients, you will taste the difference between a cheap candy melt and a high-quality 60% cacao dark chocolate.
- 16 Large Jet Puffed Marshmallows: The standard size is best; mini marshmallows are too fiddly for skewers.
- 8 oz high-quality dark chocolate chips: Look for brands like Ghirardelli or Guittard for the best meltability.
- 1 tsp Refined coconut oil: This is the secret to the "snap."
- 2 tbsp Crushed peppermint: Adds a festive crunch and a burst of cool flavor.
- 1/2 tsp Edible gold dust: For that "restaurant level" finish.
- 16 Bamboo skewers: These provide the handle for dipping and serving.
| Original Ingredient | Substitute | Why It Works |
|---|---|---|
| Dark Chocolate Chips | Milk Chocolate Chips | Sweeter profile. Note: Lower snap factor due to higher milk solids. |
| Coconut Oil | Cocoa Butter | More traditional chocolate flavor. Note: Harder to find in standard groceries. |
| Crushed Peppermint | Toasted Toffee Bits | Adds a salty, buttery crunch that pairs beautifully with dark chocolate. |
Using the right chocolate is a similar logic to the velvety texture found in a Chocolate Ball Candy recipe, where the shell's integrity is the star of the show.
Essential Tools for a Clean Finish
You don't need a professional pastry kitchen, but a few specific tools will make this process much cleaner. I’ve tried doing this with just a fork and a plate, and I ended up with chocolate up to my elbows and marshmallows that looked like they’d been through a war zone.
Preparing Your Station
Get a piece of styrofoam or a tall glass filled with dried beans. This allows you to stand the chocolate covered marshmallows on a stick upright while they set. If you lay them flat on parchment paper, you’ll get a flat side on your chocolate shell.
Melting the Chocolate
A small, deep glass bowl is better than a wide one. A deeper pool of chocolate means you can submerge the marshmallow in one go rather than having to roll it around, which creates streaks.
A Practical Guide to Flawless Dipping
- Prep the Marshmallows. Thread one large marshmallow onto each bamboo skewer, stopping about halfway through. Note: Don't poke through the top or the chocolate will leak into the hole.
- Combine Chocolate and Oil. Place 8 oz dark chocolate chips and 1 tsp coconut oil in a microwave safe bowl.
- Melt Carefully. Heat in 20 second intervals, stirring vigorously between each session until the mixture is molten and silky.
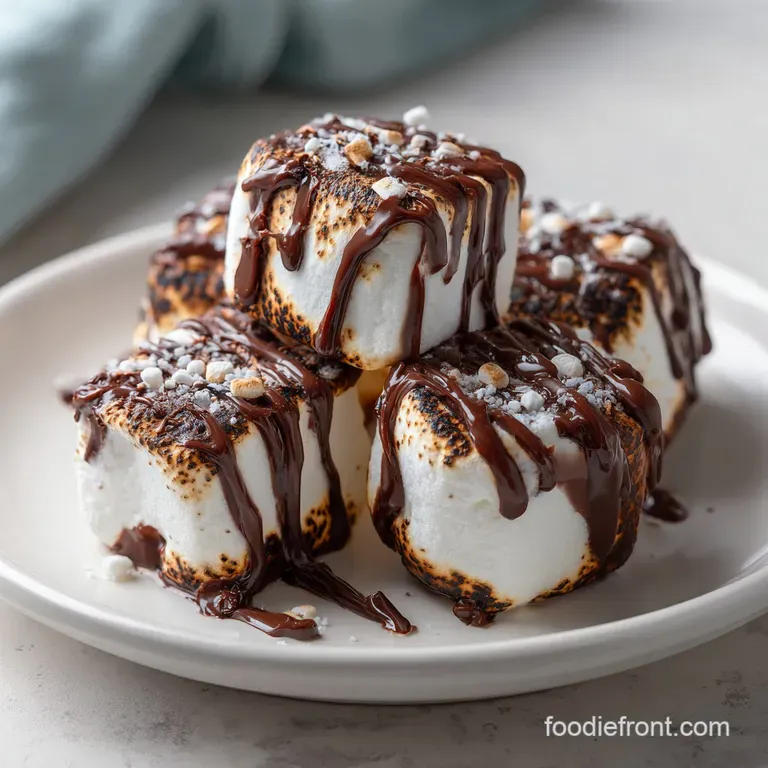
- The First Dip. Hold a skewer and plunge the marshmallow into the chocolate until it’s almost at the top.
- Remove Excess. Lift the marshmallow and tap the skewer gently against the side of the bowl until the excess chocolate stops dripping.
- Add Texture. While the chocolate is still wet, sprinkle with crushed peppermint. Note: Do this quickly before the cold marshmallow sets the chocolate.
- Apply the Gold. Once the chocolate is matte and set (about 5 minutes), use a dry brush to highlight with gold dust.
- Final Set. Place the skewers upright in your styrofoam block until the shell is hard and shatter prone.
Chef's Tip: If your chocolate starts to thicken during the process, pop it back in the microwave for 10 seconds. Cold chocolate leads to thick, clumpy shells.
Avoiding Common Dipping Disasters
Even an easy chocolate covered marshmallows recipe can go sideways if the chocolate isn't handled with respect. The biggest enemy here is water. One single drop of water in your melting chocolate will turn it into a gritty, paste like mess known as "seizing."
Why Your Chocolate is Lumpy
If your chocolate looks like wet sand, it likely overheated or caught a drop of steam. Dark chocolate is sensitive; it doesn't like temperatures over 120°F. If this happens, you can sometimes save it by stirring in another teaspoon of coconut oil, but usually, it's better to start fresh.
| Problem | Root Cause | Solution |
|---|---|---|
| Chocolate is streaky | Undermelted fat crystals | Stir longer or add 5 seconds of heat to fully emulsify. |
| Marshmallow slides off | Chocolate was too hot | Let the chocolate sit for 2 minutes to cool slightly before dipping. |
| Shell is soft/sticky | Not enough oil or high humidity | Refrigerate for 10 minutes to force the fat to crystallize. |
A similar technique for managing chocolate consistency is essential when making a Chocolate Almond Bark recipe, where the set time is crucial for that perfect break.
Common Mistakes Checklist
- ✓ Never use a wet spoon to stir your melting chocolate (it will seize instantly).
- ✓ Don't skip the coconut oil - it provides the necessary fluidity for a thin coating.
- ✓ Avoid over microwaving; the bowl stays hot and continues to melt the chips.
- ✓ Ensure marshmallows are at room temperature or slightly chilled, never frozen solid.
- ✓ Use a deep, narrow bowl to maximize the "dipping depth" of your chocolate.
Exciting Variations for Every Palate
If you want to move beyond the basic homemade chocolate covered marshmallows, there are dozens of ways to play with flavor. In Europe, these are often sold as "Schokomashmallows" or "Ptasie Mleczko," depending on the region.
The German Recipe Variation (Schokomashmallows)
The chocolate covered marshmallows German recipe often uses a much thinner, snappier milk chocolate and is sometimes flavored with a hint of rum or vanilla in the marshmallow itself. You can mimic this by adding a drop of rum extract to your chocolate.
The Vegan Transformation
You can easily make these vegan by using gelatin free marshmallows (like Dandies) and dairy-free dark chocolate chips. The coconut oil is already vegan friendly, so the "snap" remains the same!
If you want X, do Y: If you want a salty sweet combo, swap peppermint for crushed pretzels and a pinch of flaky sea salt. If you want a "S'mores" vibe, roll the wet chocolate in graham cracker crumbs. If you want a coffee kick, whisk 1/2 tsp of espresso powder into the melted chocolate.
Storing Your Treats for Maximum Crunch
You've put in the effort to get that perfect chocolate covered marshmallows easy recipe finished, so don't ruin it by tossing them in a plastic bag. Moisture is the enemy of the crunch.
Storage Guidelines: Keep your treats in an airtight container at room temperature for up to 5 days. If your house is very warm, you can put them in the fridge, but be aware that they might develop "sugar bloom" (white spots) when they come back to room temperature.
This is just the sugar crystallizing and doesn't affect the flavor, but it does look less "impressive."
Zero Waste Tip: If you have leftover melted chocolate, don't wash it down the drain! Stir in some nuts or leftover crushed peppermint to make a quick "bark," or drizzle it over a bowl of popcorn for a late night snack.
Elevating Your Display for Any Occasion
Presentation is where these truly shine. Depending on how much time you have, you can serve these in three distinct ways:
- Simple: Place the marshmallows on a platter lined with parchment paper. It’s casual and easy for kids to grab.
- Polished: Serve them upright on the bamboo skewers, arranged in a glass jar filled with sugar or coffee beans to keep them standing.
- Restaurant: Lay them on a dark slate board, add a final "flick" of edible gold dust, and serve alongside a Brown Sugar Latte recipe for the ultimate dessert experience.
| Plating Level | Presentation Tweak | Vibe |
|---|---|---|
| Simple | Flat on a white plate | Casual family snack |
| Polished | Upright in a jar | Boutique candy shop |
| Restaurant | Slate board with gold dust | Fine dining dessert |
Kitchen Myths Debunked
One common myth is that you must temper chocolate to get a snap. While tempering is great for professional truffles, the addition of coconut oil in this recipe creates a "cheat" version of tempering that provides the snap without the 30 minute thermometer watching session.
Another myth is that you can't freeze chocolate covered treats. You actually can! The marshmallows won't freeze solid because of their sugar content, but they will become very chewy. Just ensure they are in a vacuum sealed bag to prevent freezer burn from ruining the velvety chocolate surface.
These chocolate covered marshmallows on a stick are more than just a quick snack; they are a gateway to understanding how chocolate behaves. Once you've mastered the dip and the snap, you'll find yourself looking for anything else in the pantry that can be covered in dark chocolate. (And honestly?
Most things should be.)
If you're looking for another simple way to satisfy a chocolate craving without turning on the oven, try the No Bake Chocolate Cookies recipe — it’s just as fast and uses many of the same pantry staples. Happy dipping!

Recipe FAQs
How to melt chocolate to coat marshmallows?
Melt at 50% power in 20-second intervals, stirring vigorously between each session. Add 1 teaspoon of refined coconut oil to the chocolate chips before melting to ensure it becomes fluid and coats thinly.
What is a marshmallow covered in chocolate called?
This treat is generally referred to as chocolate covered marshmallows. In some European bakeries, similar items are known by regional names like "Schokomashmallows."
How long will marshmallows dipped in chocolate last?
Keep them stored airtight at room temperature for up to 5 days. The biggest threat to longevity is humidity, which can cause the chocolate shell to soften or weep.
Are chocolate covered marshmallows good?
Yes, they are excellent when made correctly for that textural contrast. The goal is a thin, snappy shell that breaks to reveal the soft, airy center. If you mastered the precise whisking needed for a stable emulsion here, you will nail this coating.
Can I use milk chocolate instead of dark chocolate?
Yes, but the texture will change slightly. Milk chocolate has higher milk solids, resulting in a softer shell that lacks the distinct "snap" provided by quality dark chocolate.
What is the secret to preventing a "foot" of chocolate at the bottom?
Lift the marshmallow immediately after dipping and tap the skewer against the bowl until the excess stops dripping. Using a deep, narrow melting bowl helps maximize coverage so you need less time rolling the marshmallow around.
Is it necessary to chill the marshmallows before dipping?
No, chilling is not strictly necessary, but briefly freezing them for 10 minutes is highly recommended. This firms up the gelatin structure so the marshmallow does not deform or melt when it touches the warm chocolate coating.
Chocolate Covered Marshmallows

Ingredients:
Instructions:
Nutrition Facts:
| Calories | 106 kcal |
|---|---|
| Protein | 1.1 g |
| Fat | 5.6 g |
| Carbs | 13.8 g |
| Fiber | 1.1 g |
| Sugar | 11.2 g |
| Sodium | 7 mg |
